Overview
This page gives you a practical overview of the Orders module in Caramel—the main workspace where your staff handle the full lifecycle of an order: Drop-Off → Assignation → Process → Collect (QC) → Pick-up.
The Orders module coordinates with other parts of Caramel—like Contacts, Service Configuration, Role Management, Calendar Management, and Image Marker—to keep customer data, pricing, permissions, capacity, and item photos in sync.
What the Orders module is for
Orders is the operational core of Caramel. Your team typically spends most of their day here—from creating new orders to running day-to-day operations and final handoff to the customer.
If your staff work with barcode scanners, most actions in Orders can be done faster via barcode input than by mouse/touch—especially in Process, Collect, and Pick-up.
Layout overview
When you enter any page inside the Orders module, you’ll see a sticky top menu at the top. It stays visible across Orders pages.
Some pages also show a second row in the top menu (for example, pages that show a progress bar). Those pages explain the extra row in their own help sections.
Orders top menu (sticky)
The Orders top menu contains a set of fixed elements, plus a middle section that may change depending on which Orders page you are in.
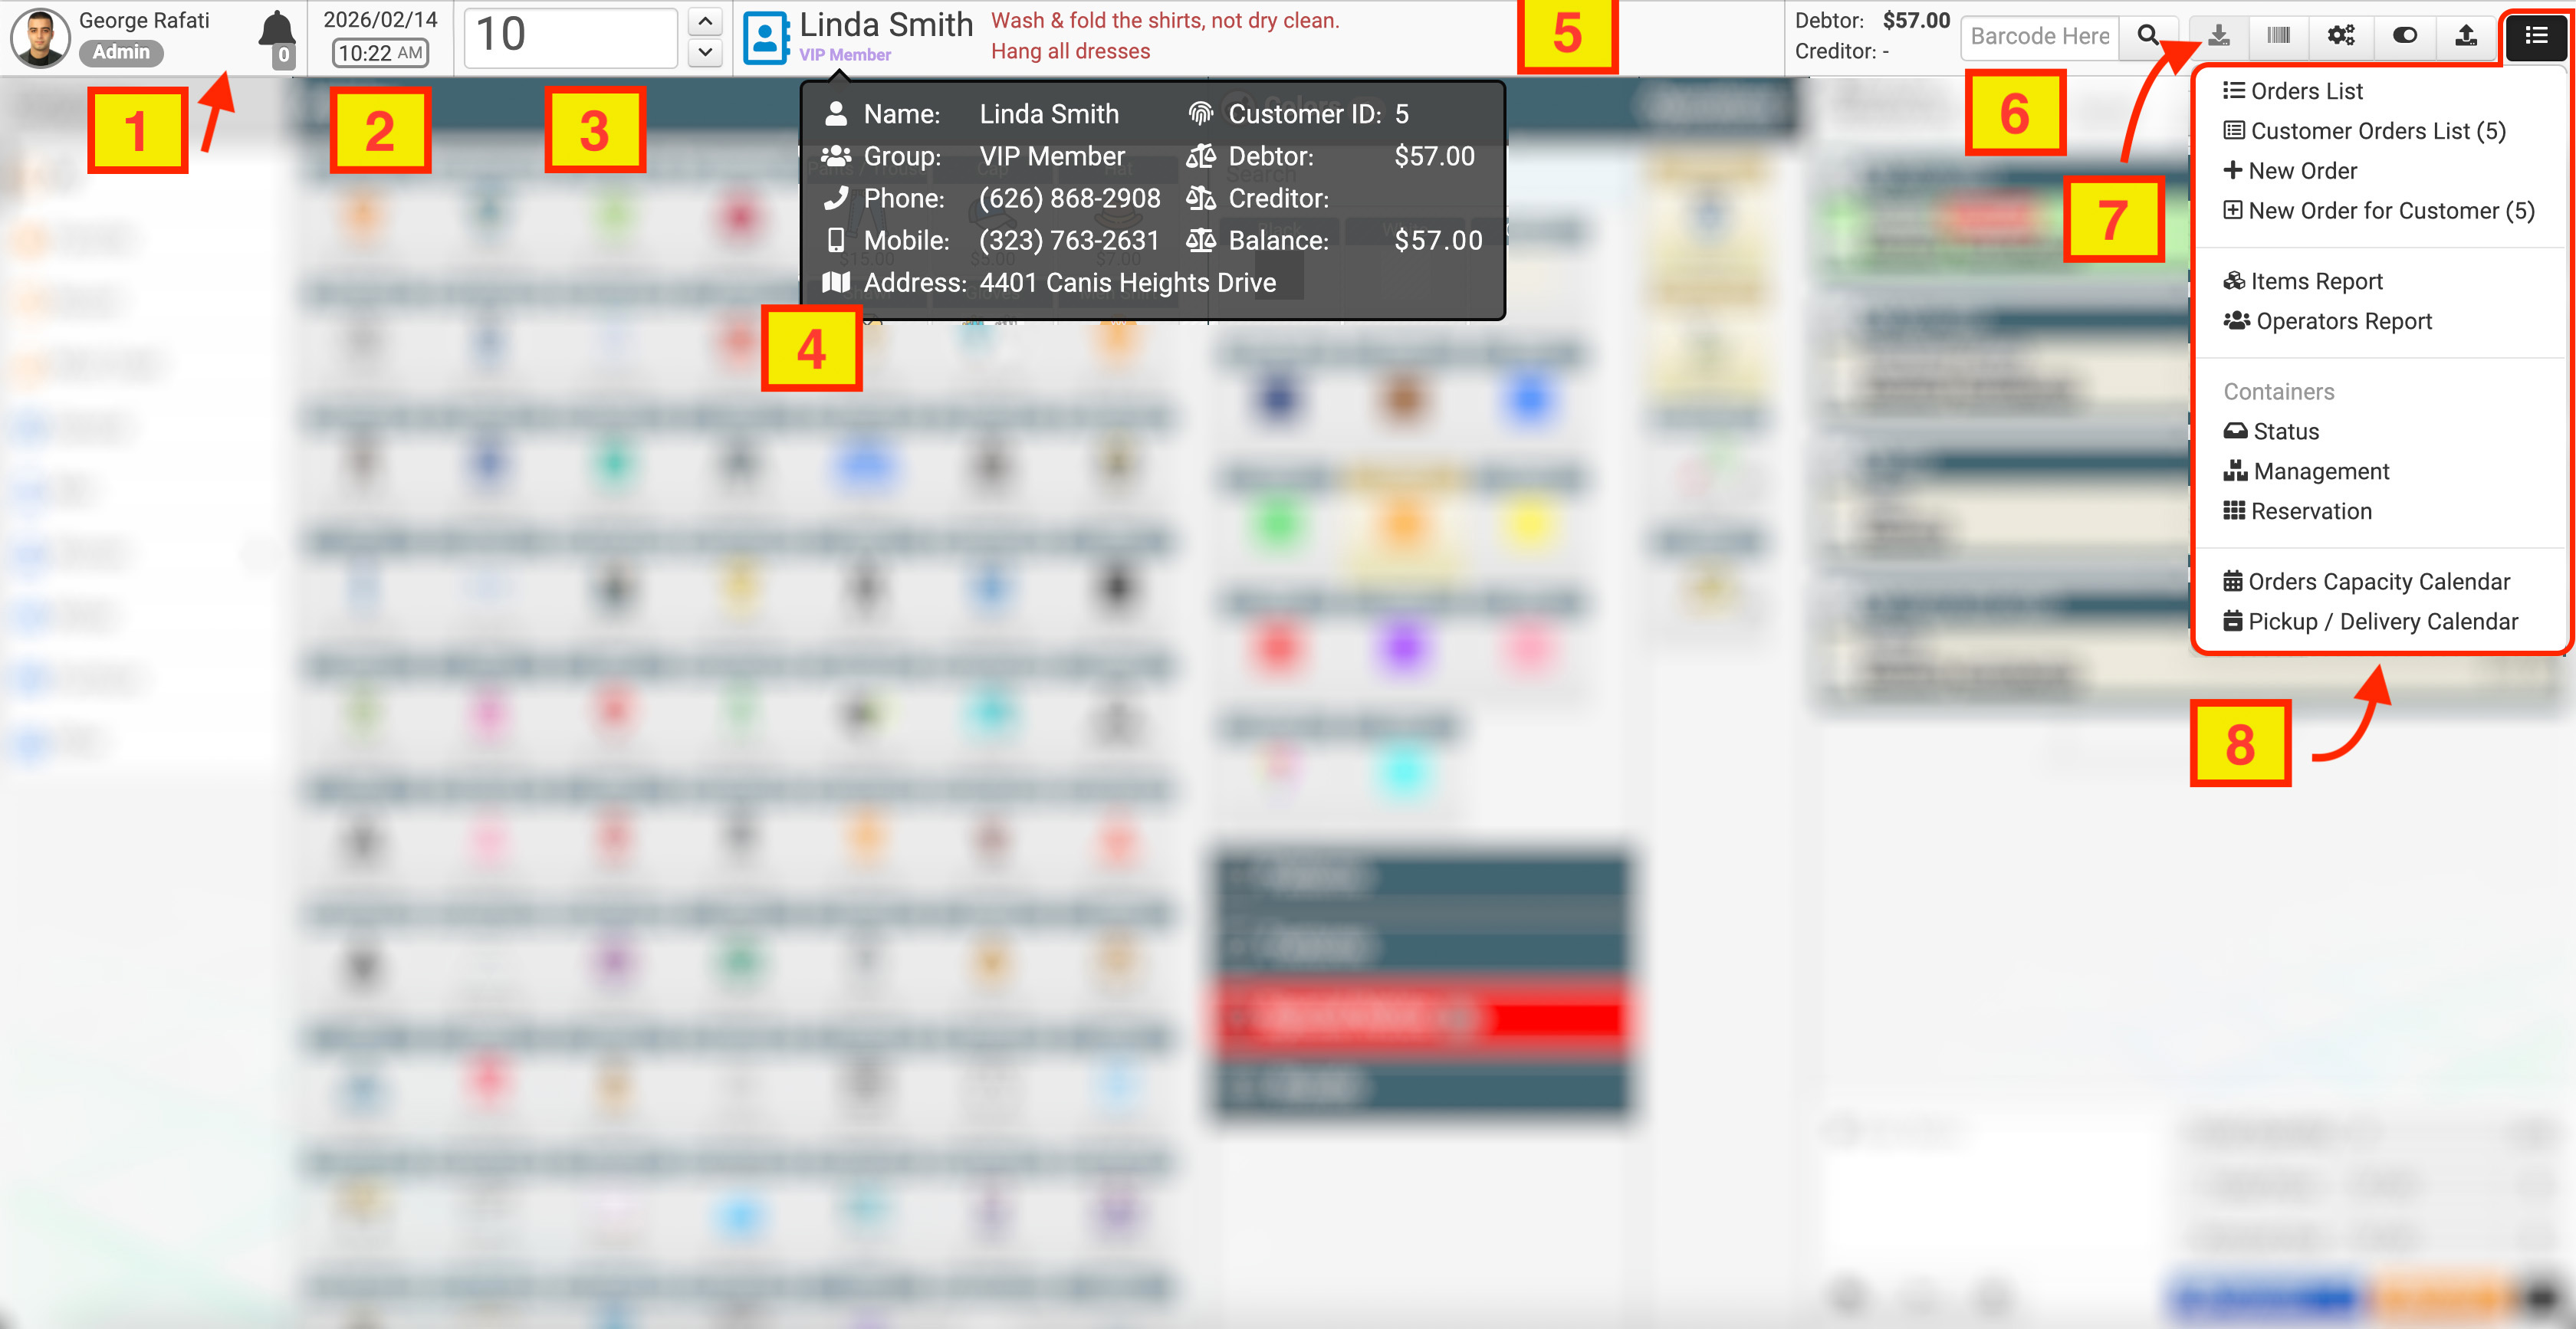
From left to right:
- Signed-in user
- Shows the user name, avatar, and role.
- Hover (or tap) to see more details and a Logout action.
- Server-based date & time
- The displayed time is aligned with the server configuration.
- Order number jump input
- A large input for jumping directly to an order number (in the current context/page).
- Two arrows (up/down) allow quick navigation to the previous/next order.
- Hover over this input to see a detailed order summary, including:
- Created date
- Received date
- Confirmed date
- Ready date
- Pick-up date
- Creator
- Receptor
- Confirming user
- Picker (driver)
- Address
- And other related details
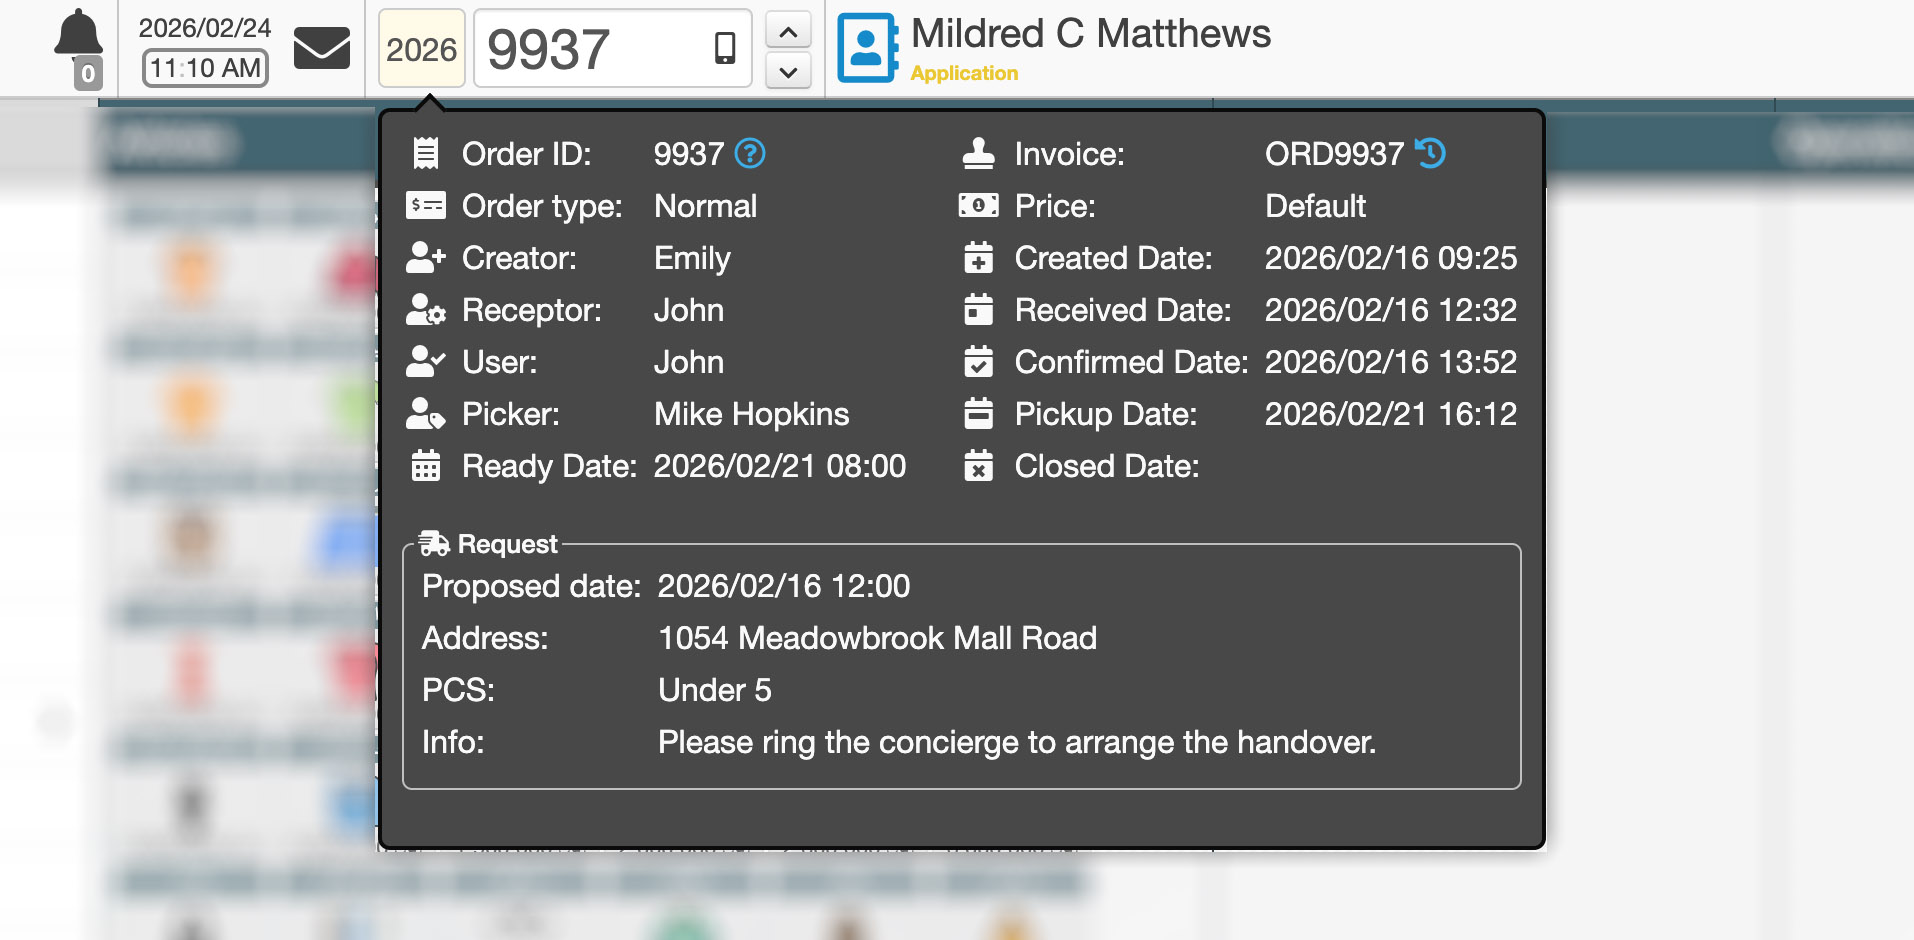
Inside the hover panel:
-
View operation history
Displays the timeline of performed workflow actions for this order. -
View order change history
Shows all recorded modifications made to the order (edits, updates, status changes, etc.).
- Customer quick view
- customer icon + customer name + customer group.
- Hover (or tap) to see customer details (address, phone, balance/debt, and more).
- If you have permission, clicking the customer icon opens the customer record in Contacts for quick editing.
- Middle area (page-dependent)
- Often shows the customer memo/note on many pages.
- The exact content may vary by page.
- Barcode input
- If a barcode scanner is used, the scanned value is automatically inserted here (even if focus is elsewhere).
- Also useful for manual entry in special cases.
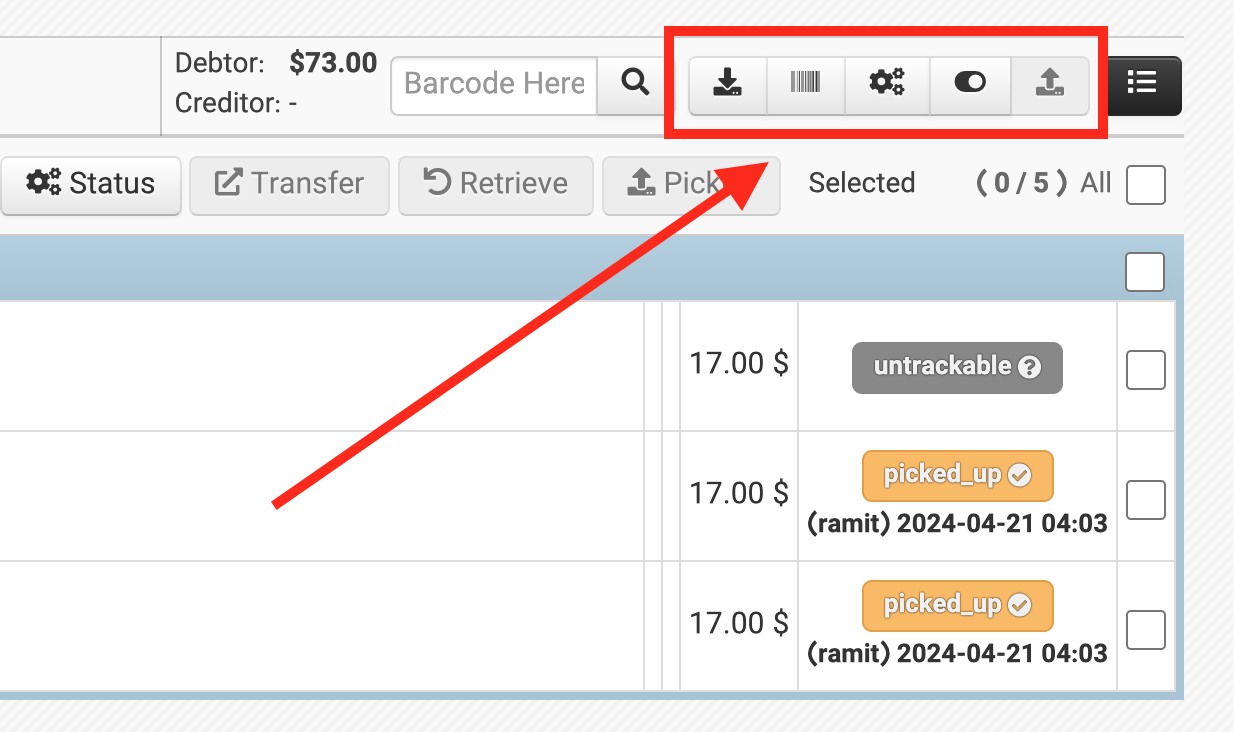
- Five quick navigation icons These shortcuts move you between the main Orders stages:
- Drop
- Assignation
- Process
- Collect
- Pick-up
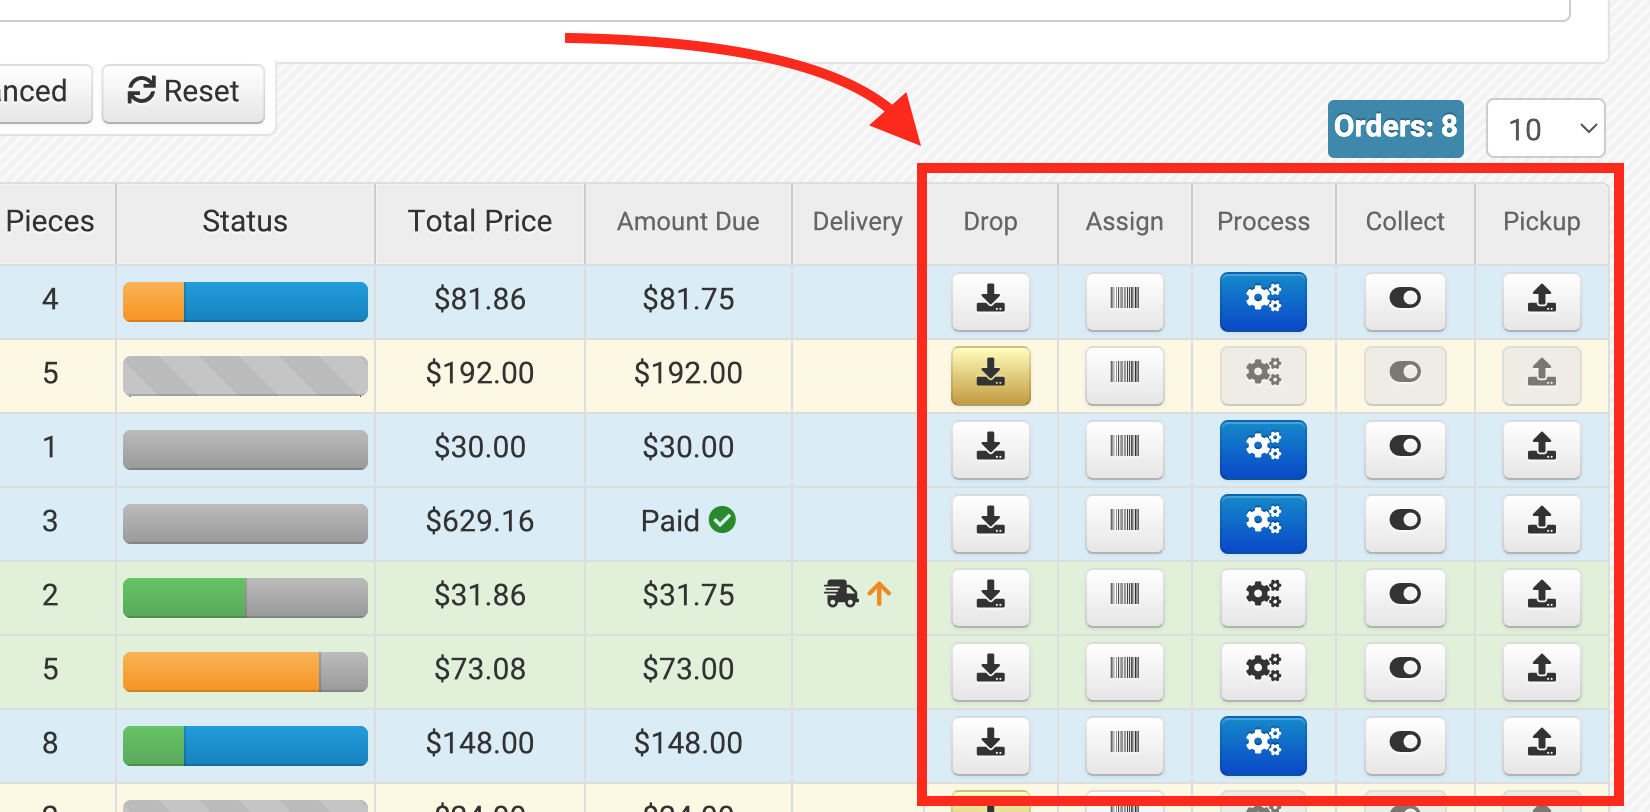
The same five-stage shortcuts also appear per row in Orders Management (List & Search), so you can jump into a specific stage for any order.
- Hamburger Menu
- The black hamburger icon on the far right is a fast access menu for common Orders tools.
- It is available on all Orders pages.
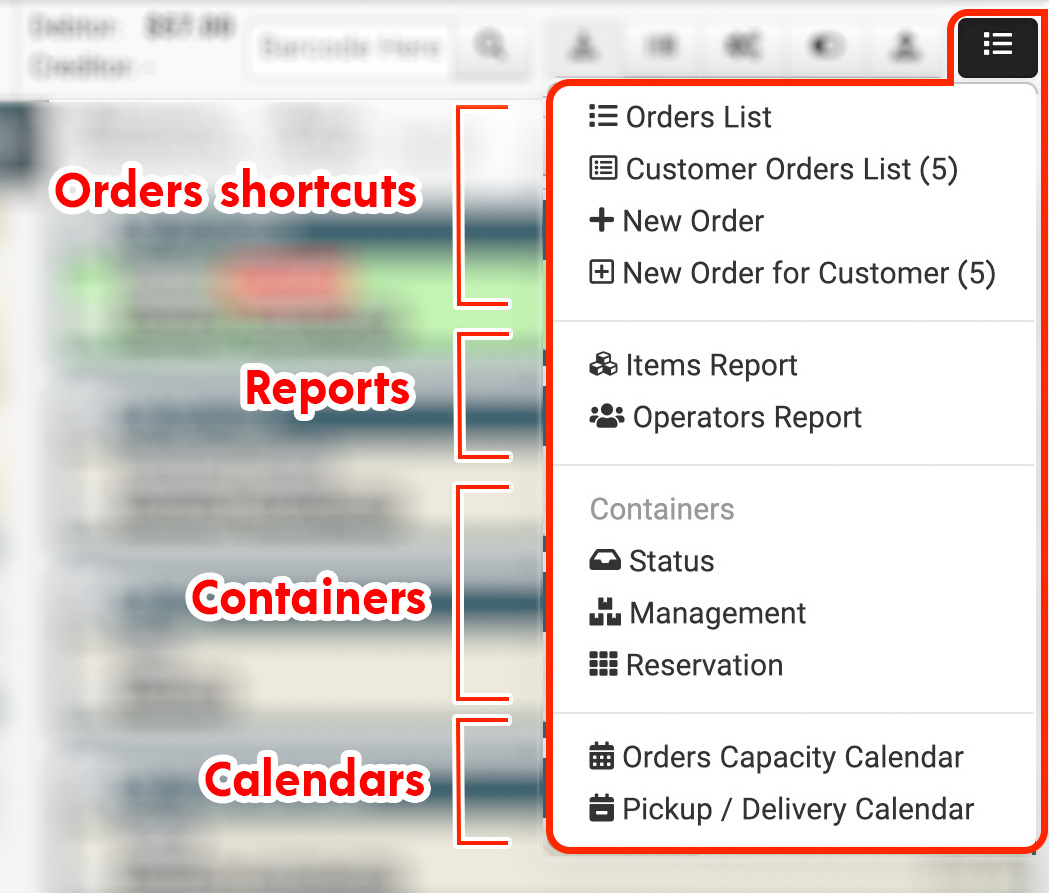
Hamburger Menu options
The Hamburger Menu contents depend on whether you are currently inside a specific order.
- If you are inside an order, customer-specific options appear.
- If you are not inside an order, customer-specific options are hidden.
Typical options include:
Orders shortcuts
- Orders List — Go back to the orders list
- Customer Orders List (5) — Show orders for the current customer (example: customer ID 5)
- New Order — Create a new order
- New Order for Customer (5) — Create a new order for the same customer
Reports
- Items Report — Items-related reporting
- Operators Report — Staff performance reporting
Containers
- Status — Current container/storage status
- Management — Manage and define container/storage locations
- Reservation — Rules for reserving container space (example: keep long items on tall shelves)
Calendars (read-only access)
- Orders Capacity Calendar — View daily capacity calendar (view only)
- Pickup / Delivery Calendar — View pickup/delivery capacity calendar (view only)
If you don’t see some items in this menu, it’s usually due to your role permissions (see Role Management).
Quick tour of the Orders workflow
This section explains what each stage is for, and when teams typically use it.
1) Management (List & Search)
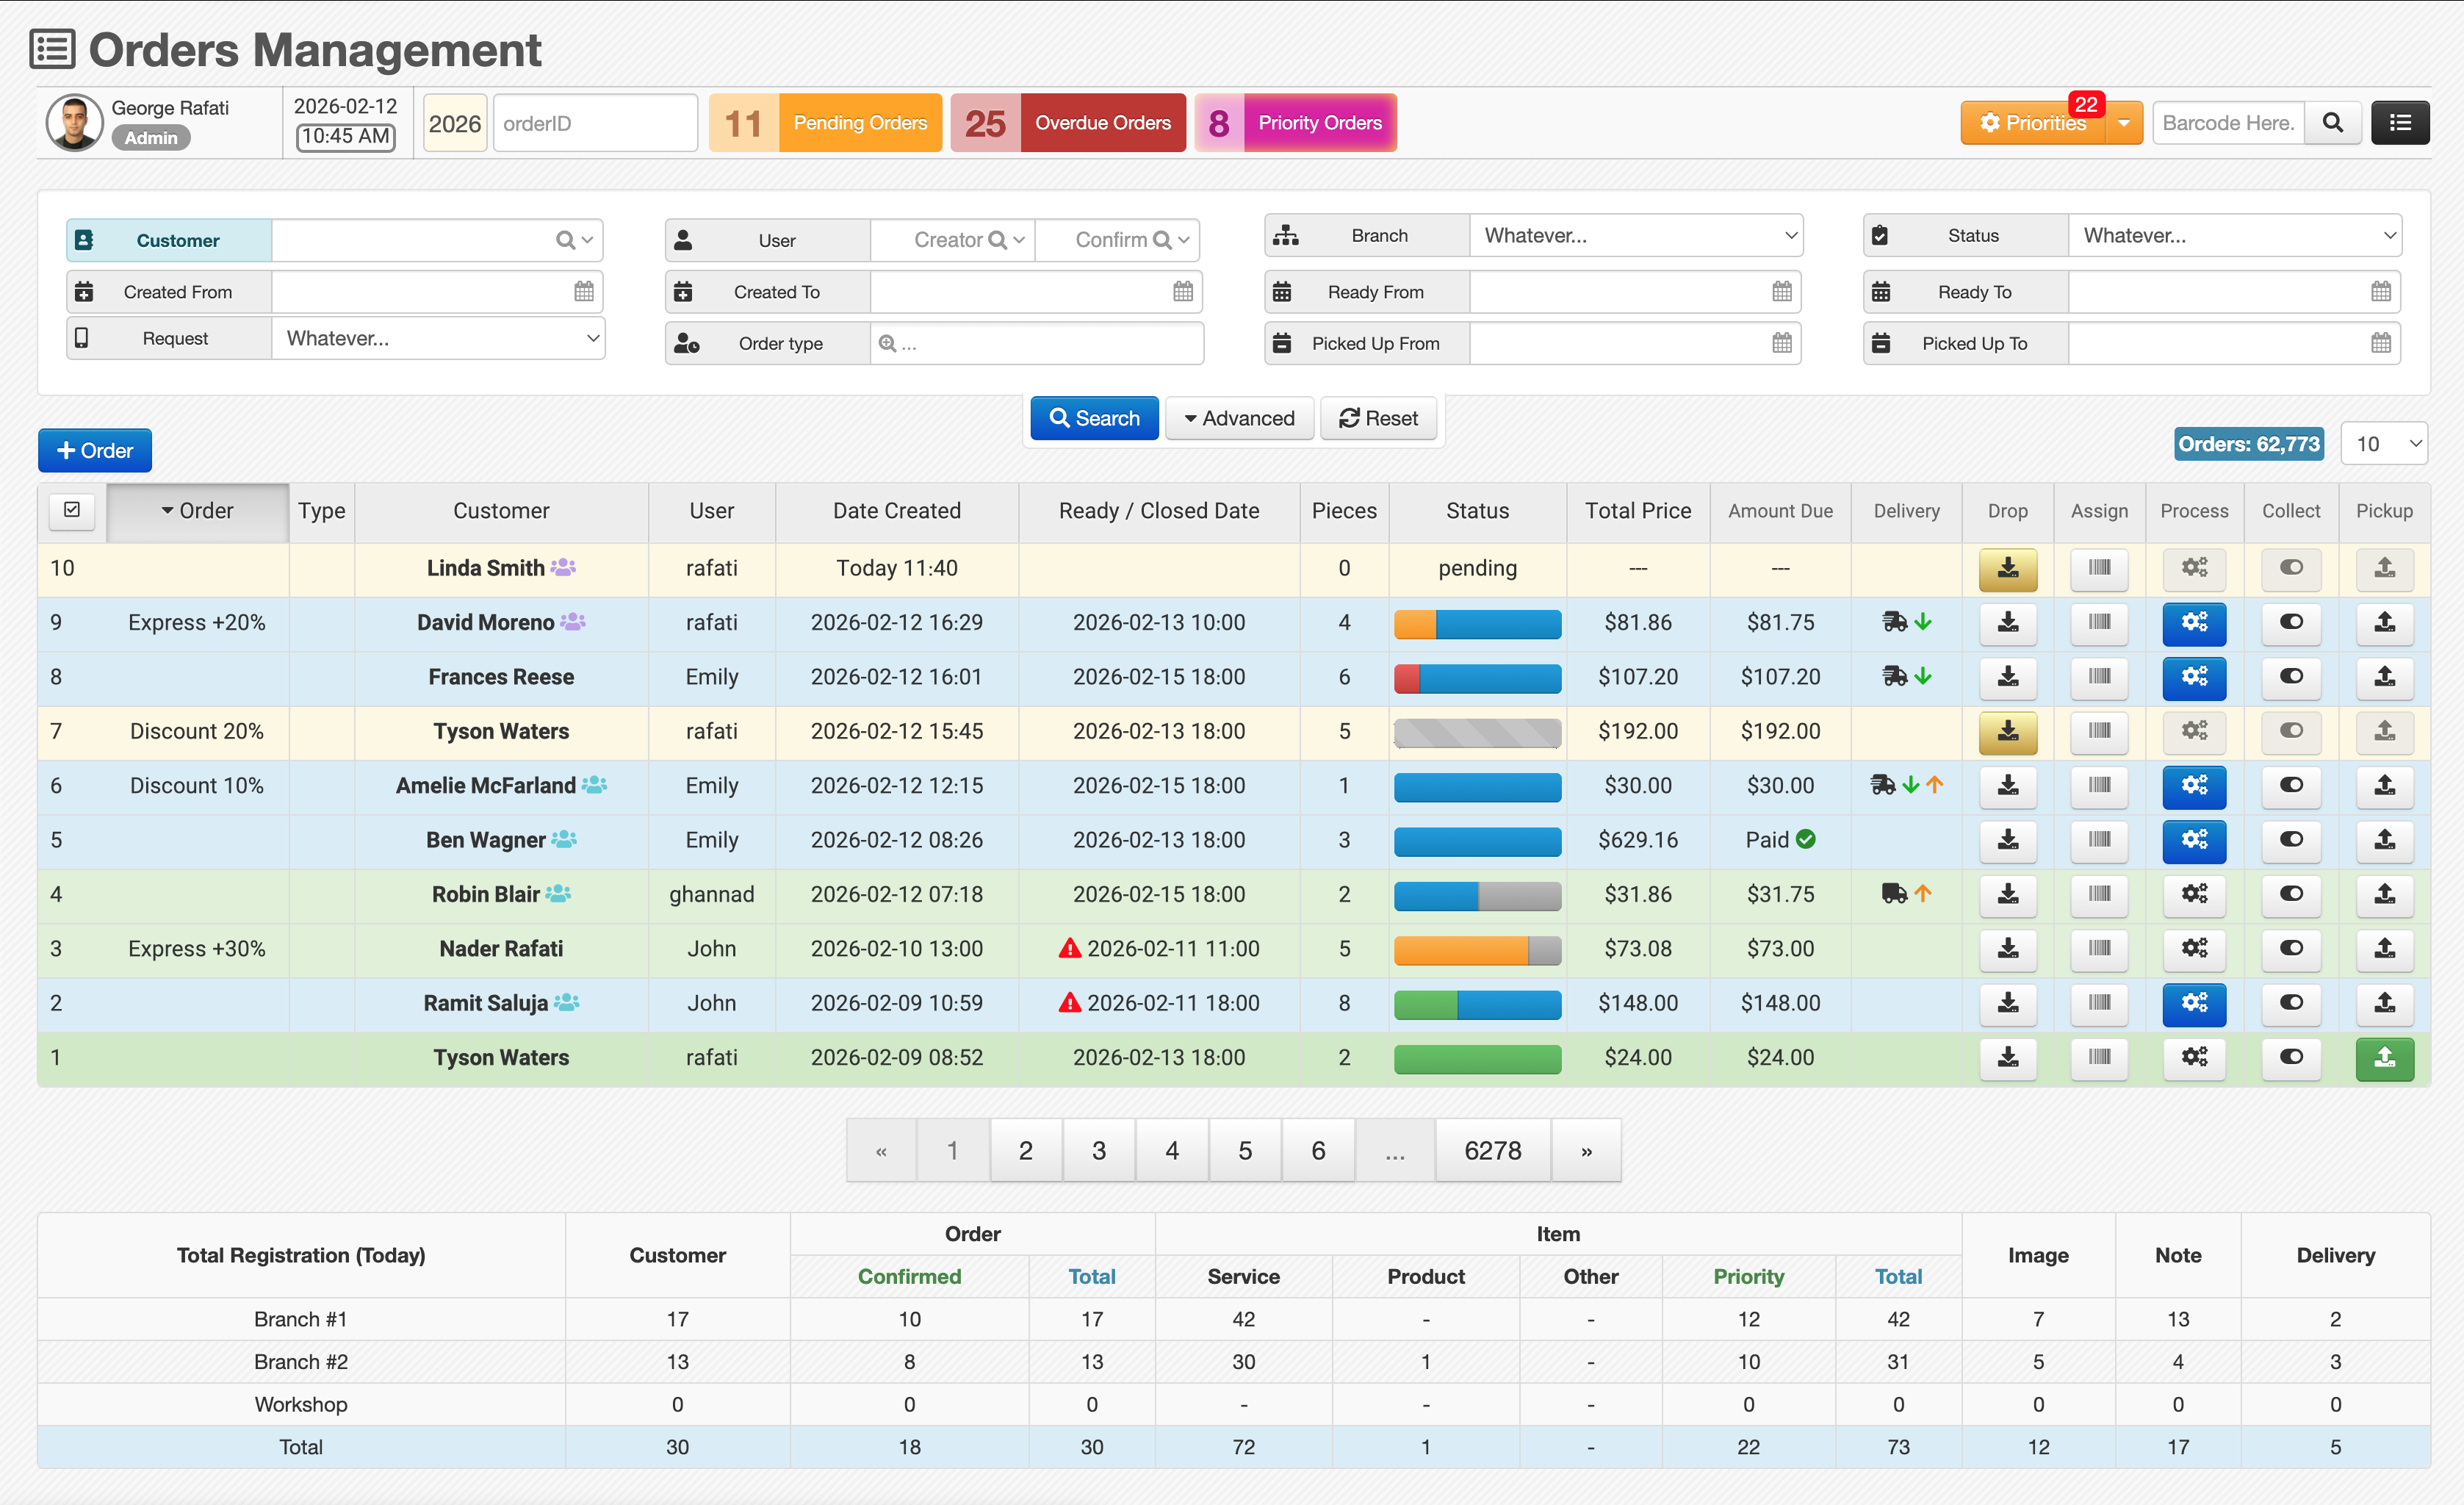
This is where you review orders at a high level:
- Search and filter orders based on your needs
- See alerts such as pending, overdue, or priority orders
- Jump into any stage (Drop/Assignation/Process/Collect/Pick-up) per order
- Track readiness using the status progress bar shown in the list
- Clicking the progress bar shows more details
Related help:
2) Drop-Off (Create a new order)
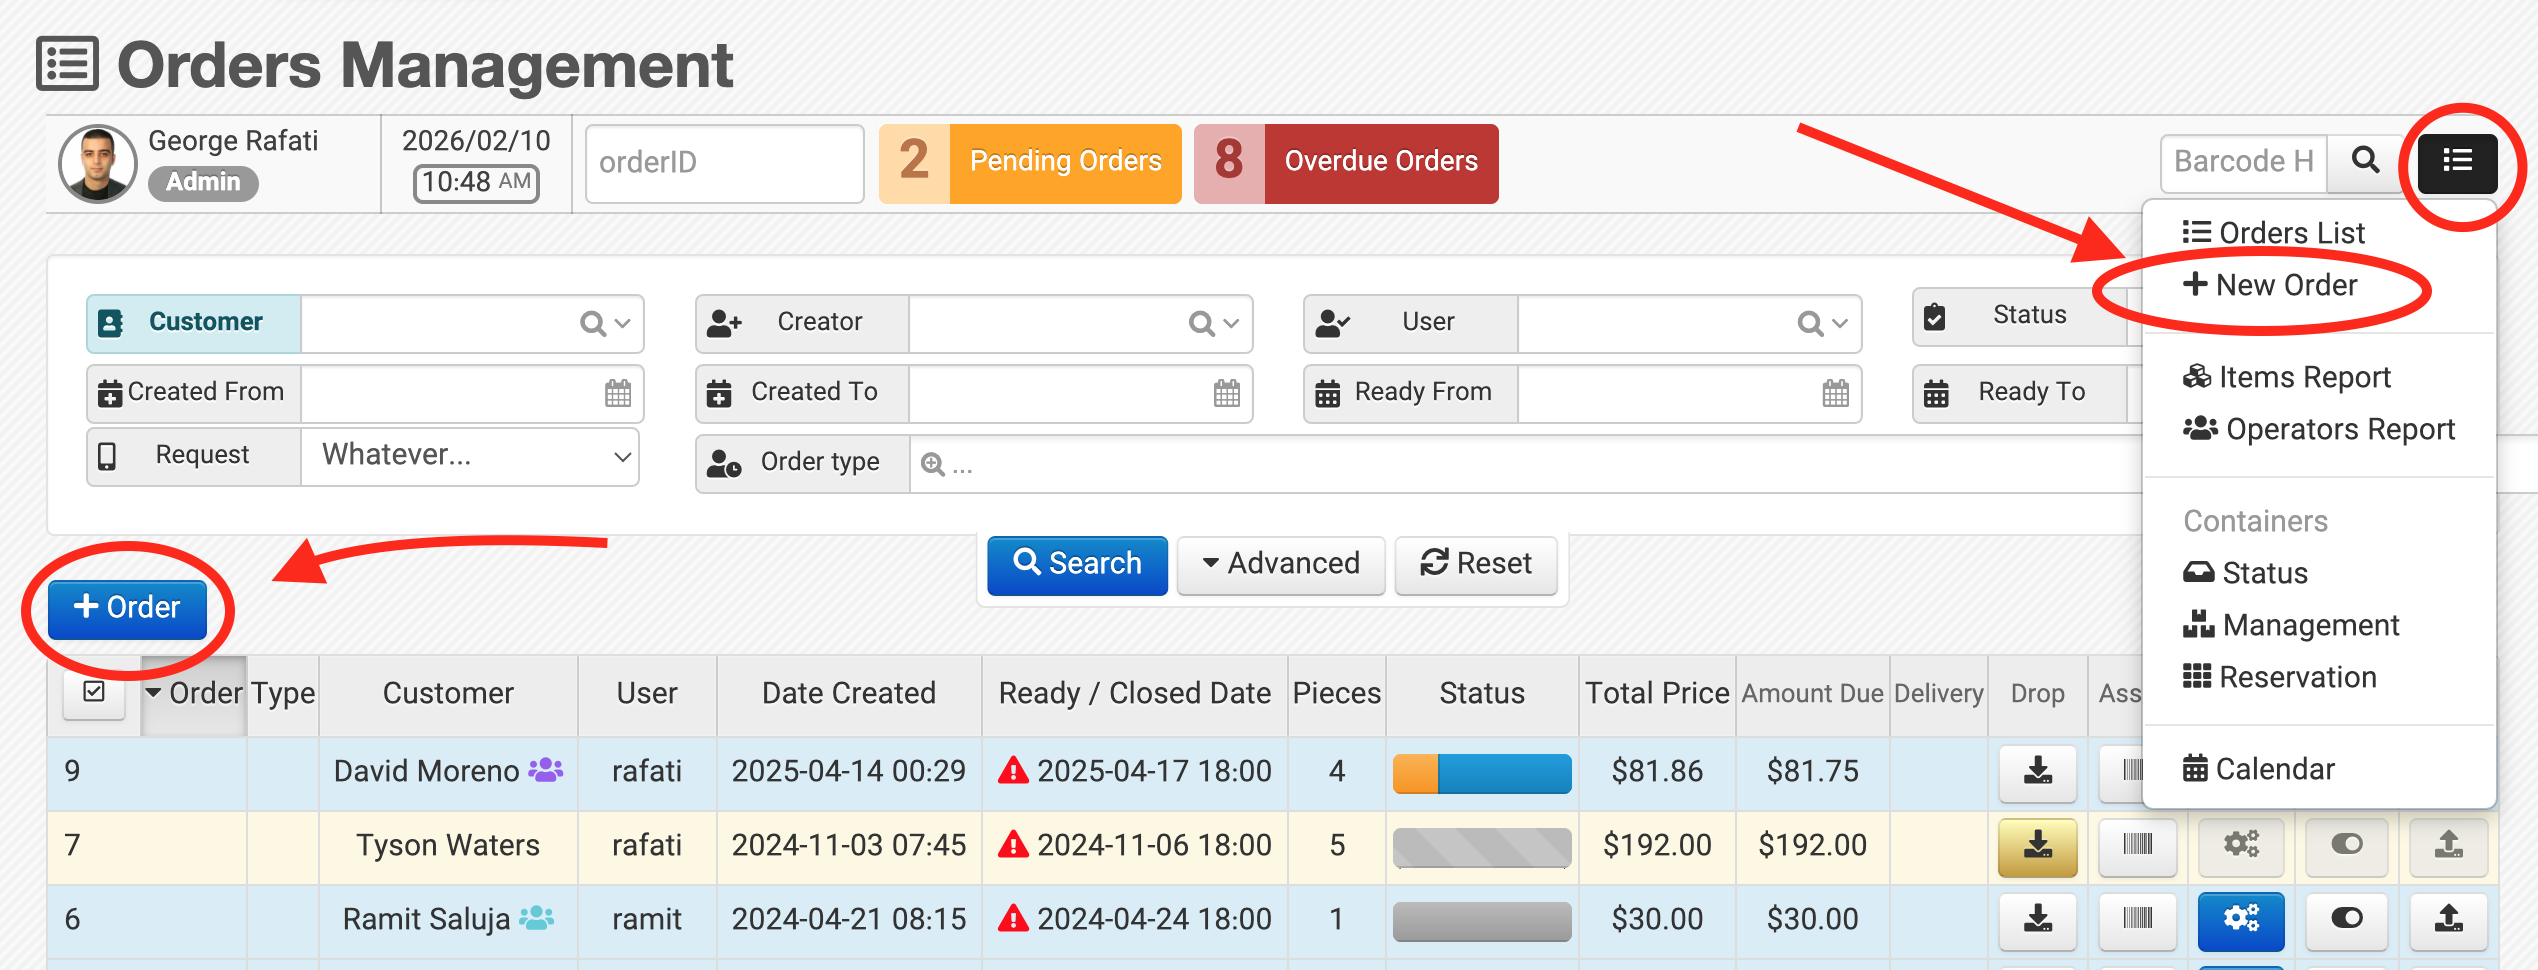
You can start a new order in two ways:
- Click + Order on the Orders Management page
- Use Hamburger Menu → New Order
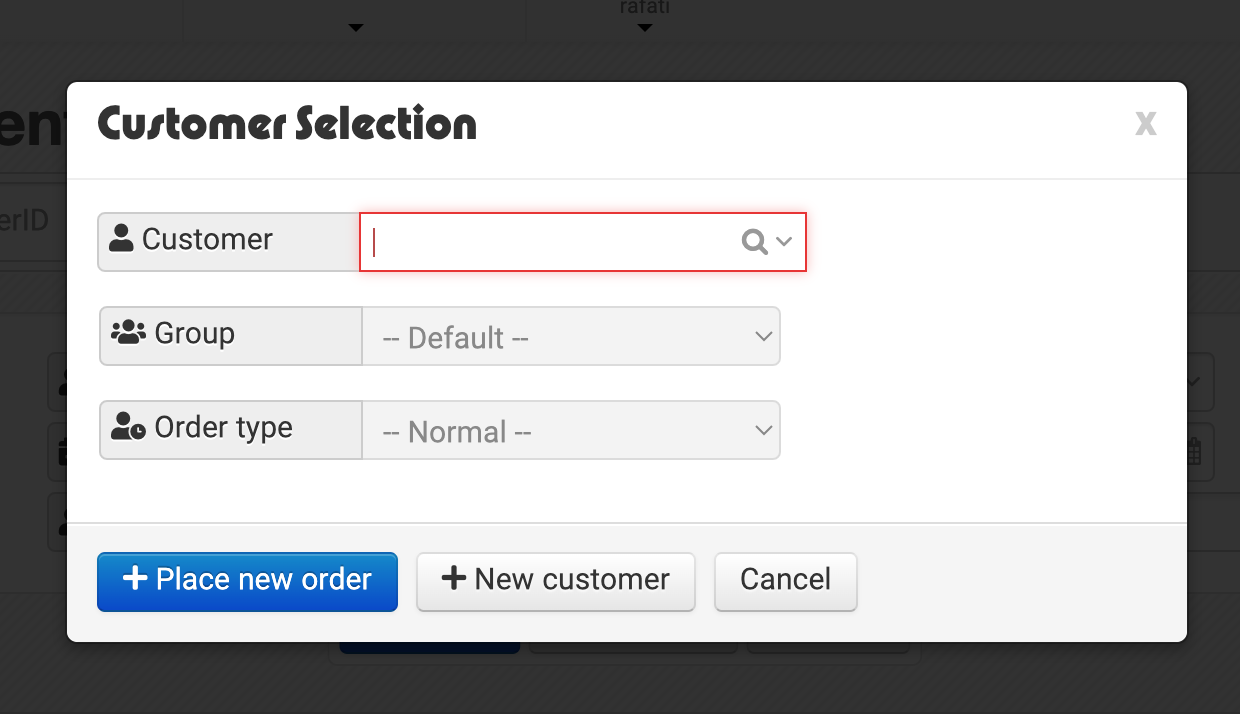
After selecting an existing customer (or creating a new one), you enter the Drop-Off stage.
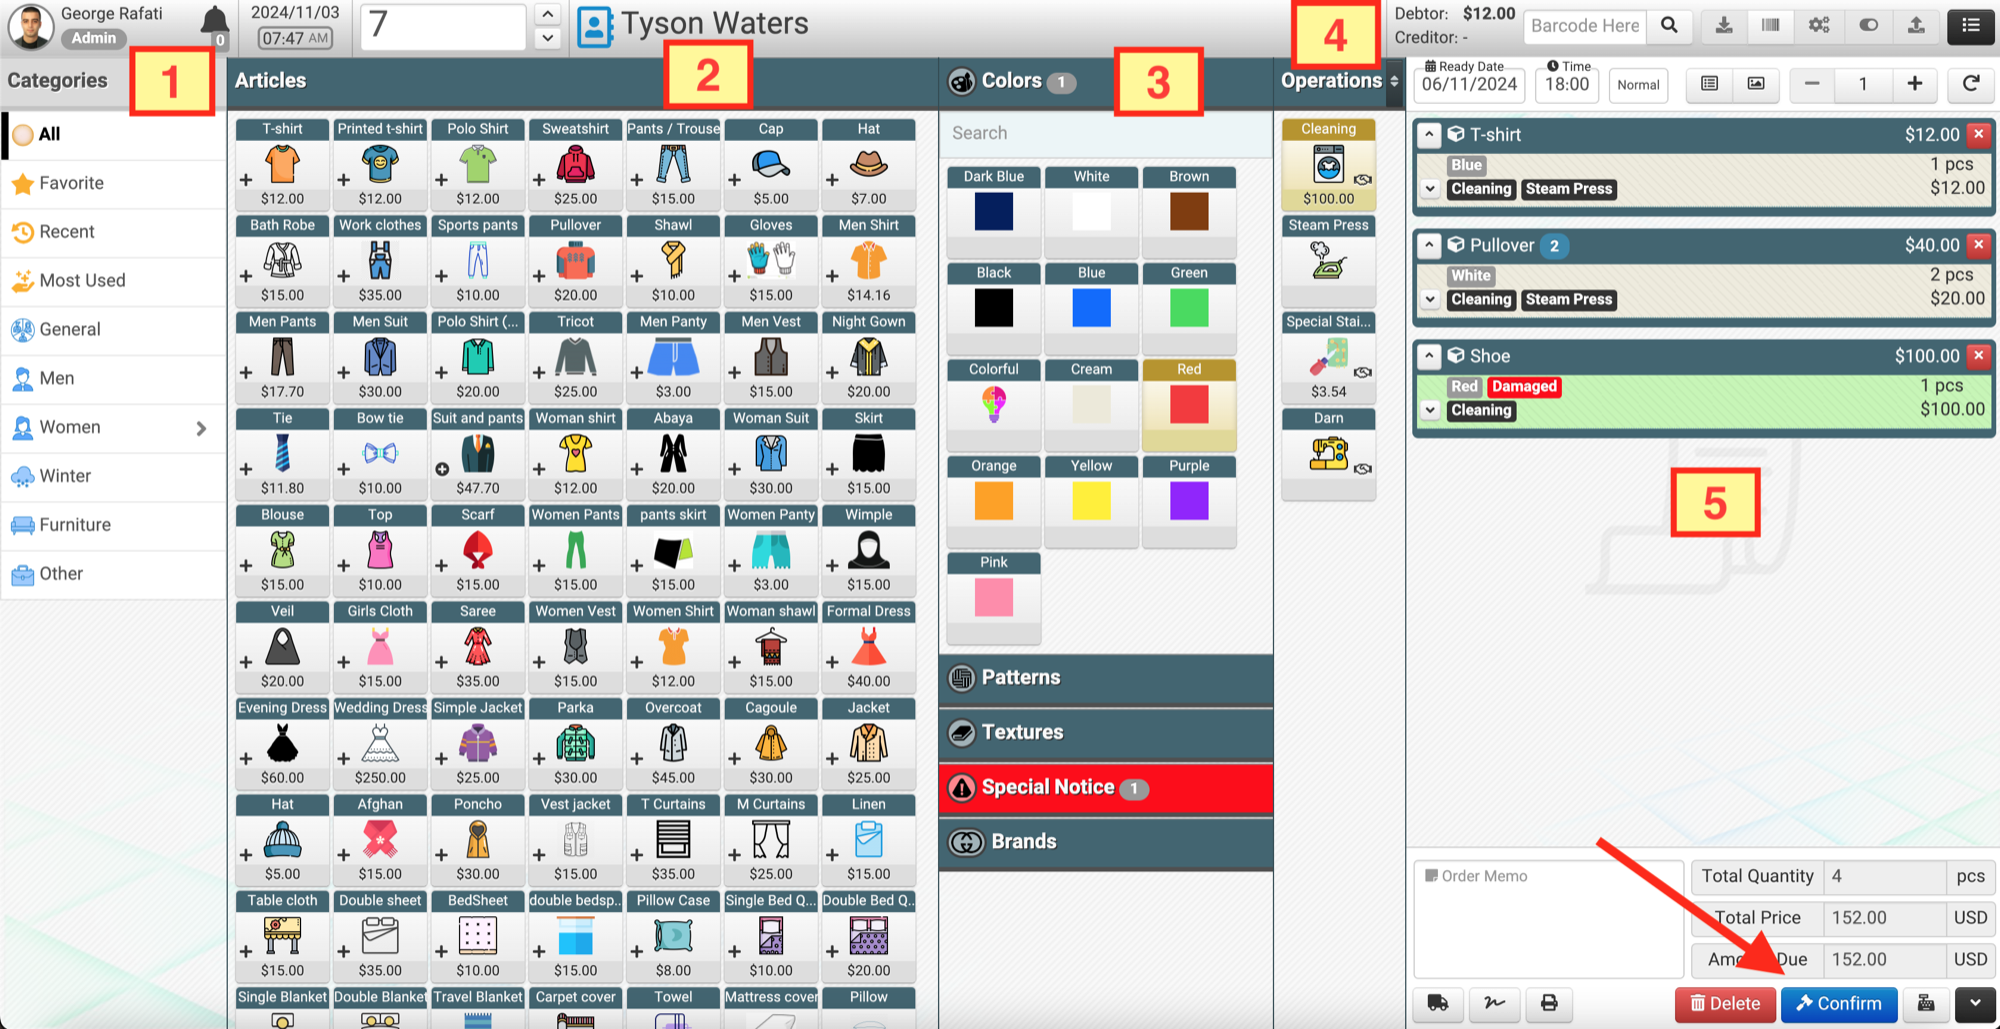
Typical layout (left to right):
- Select an article category
- Select the article
- Choose relevant options
- Choose relevant operations
- Review the result summary in the final column
When you click Confirm:
- The invoice/receipt is confirmed
- The next stage buttons become available (Process / Collect / Pick-up)
- Payment and print actions also become available (based on your setup)
You can also:
- Assign barcodes to items (if your flow supports it)
- Print barcodes for later stages
Related help:
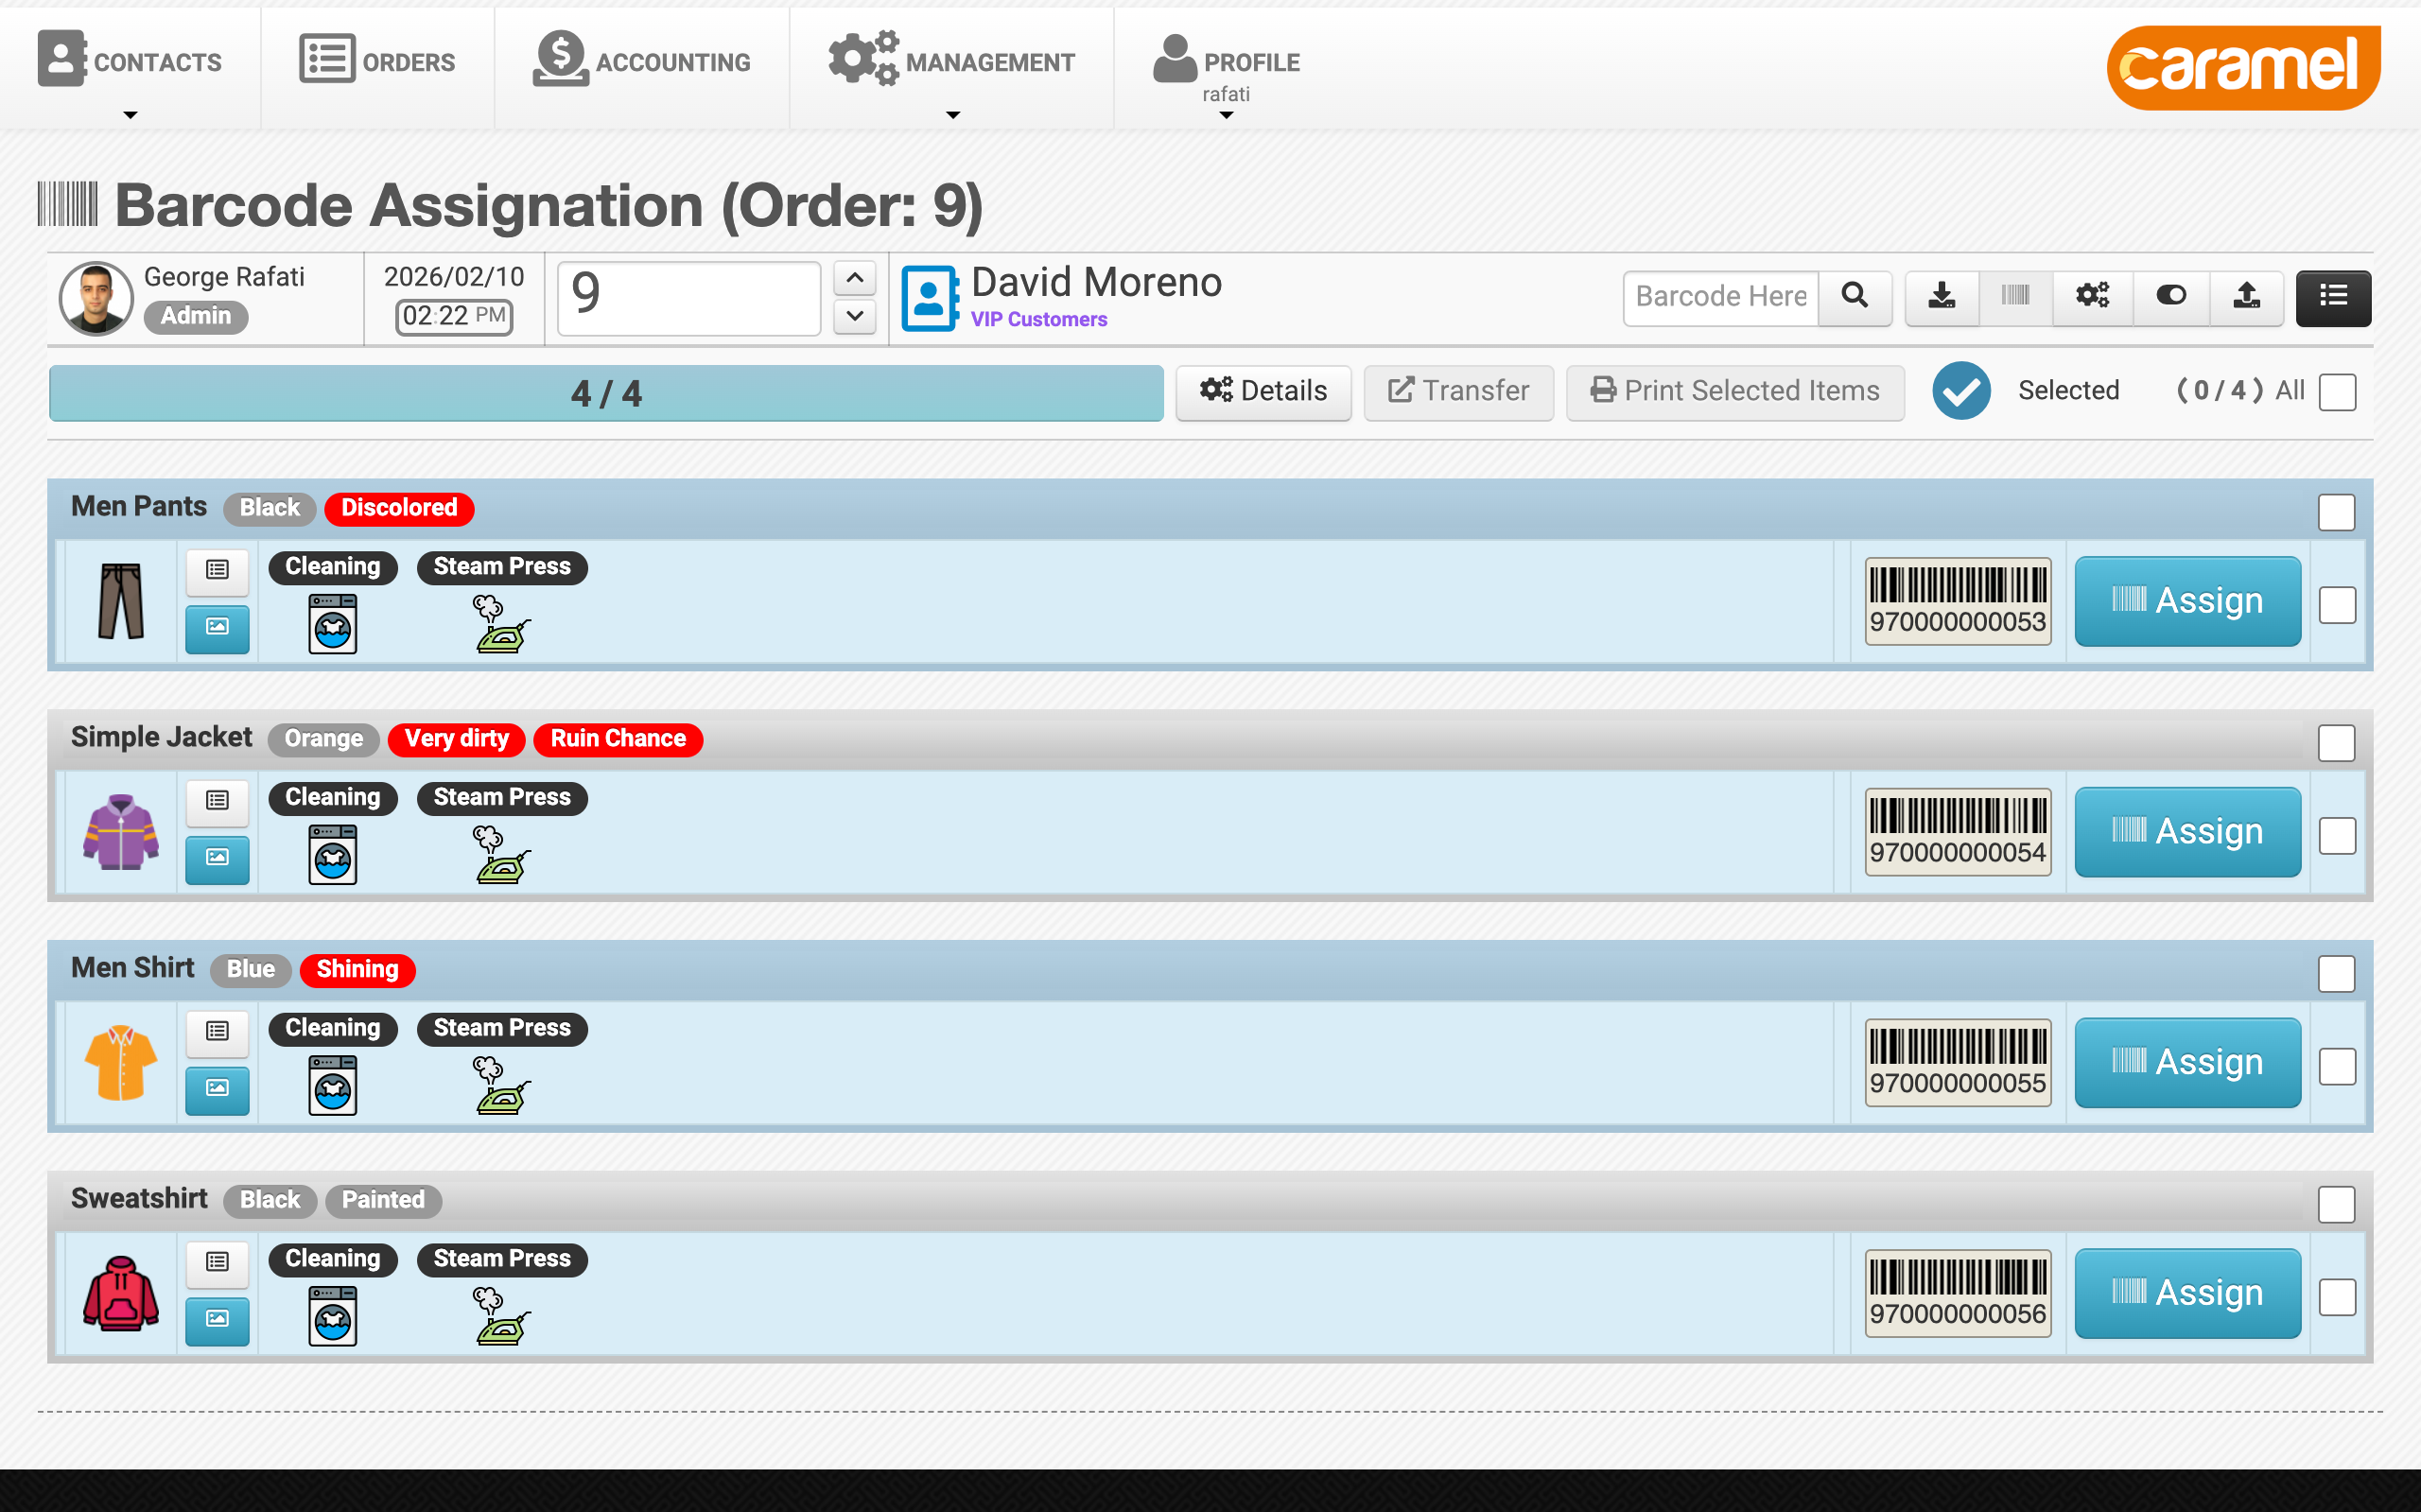
3) Assignation (barcodes)
For many businesses, barcode assignment can be done during Drop-Off, so this stage can be skipped.
Use Assignation when you need:
- Editing/removing barcodes after Drop-Off
- A separate workflow where barcode assignment is handled by a different role/team
- Item transfer from one order to another (if enabled)
- Printing barcodes for selected items (not necessarily all items)
On this page, the top menu may show a second row with a progress bar:
- How many items have barcodes vs total items
Related help:
4) Process (workflow engine)
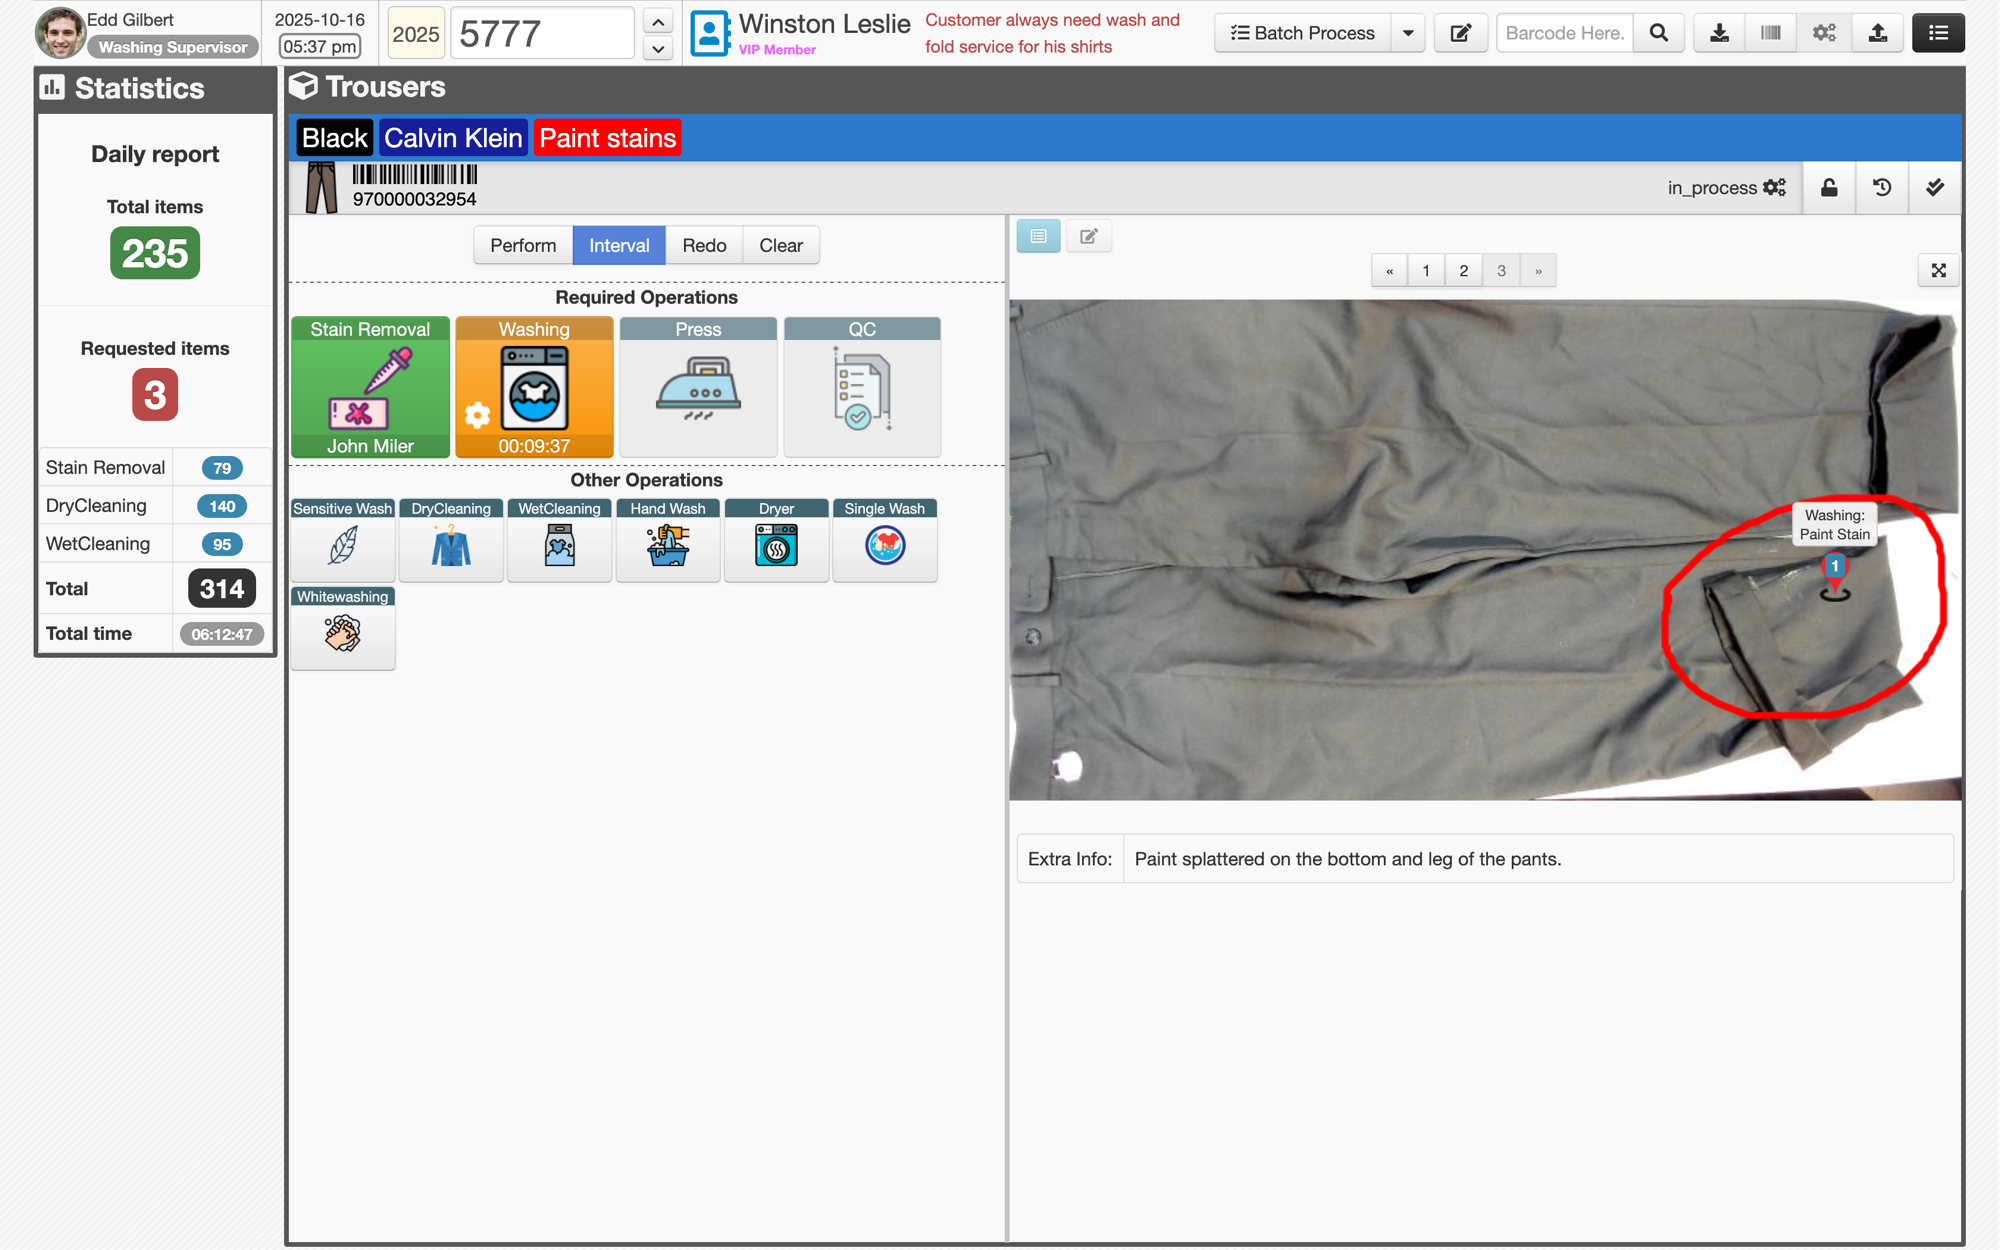
This stage is the operational “engine” and is usually configured with your business rules (often with help from the support team). It can include:
- Step sequencing and prerequisites
- Preventing invalid actions
- Clear warnings (visual + audio) to reduce mistakes
What operators typically see:
- Item barcode and details
- Item images (if Image Marker is enabled)
- Announcements/alerts
- Completed vs pending operations
- Customer memo and reception notes
Most teams run Process by scanning barcodes in sequence (batch scanning is supported). Mouse/touch control is also possible—but scanning is typically faster.
Related help:
5) Collect (QC)
Collect is usually the final internal preparation step before handoff.
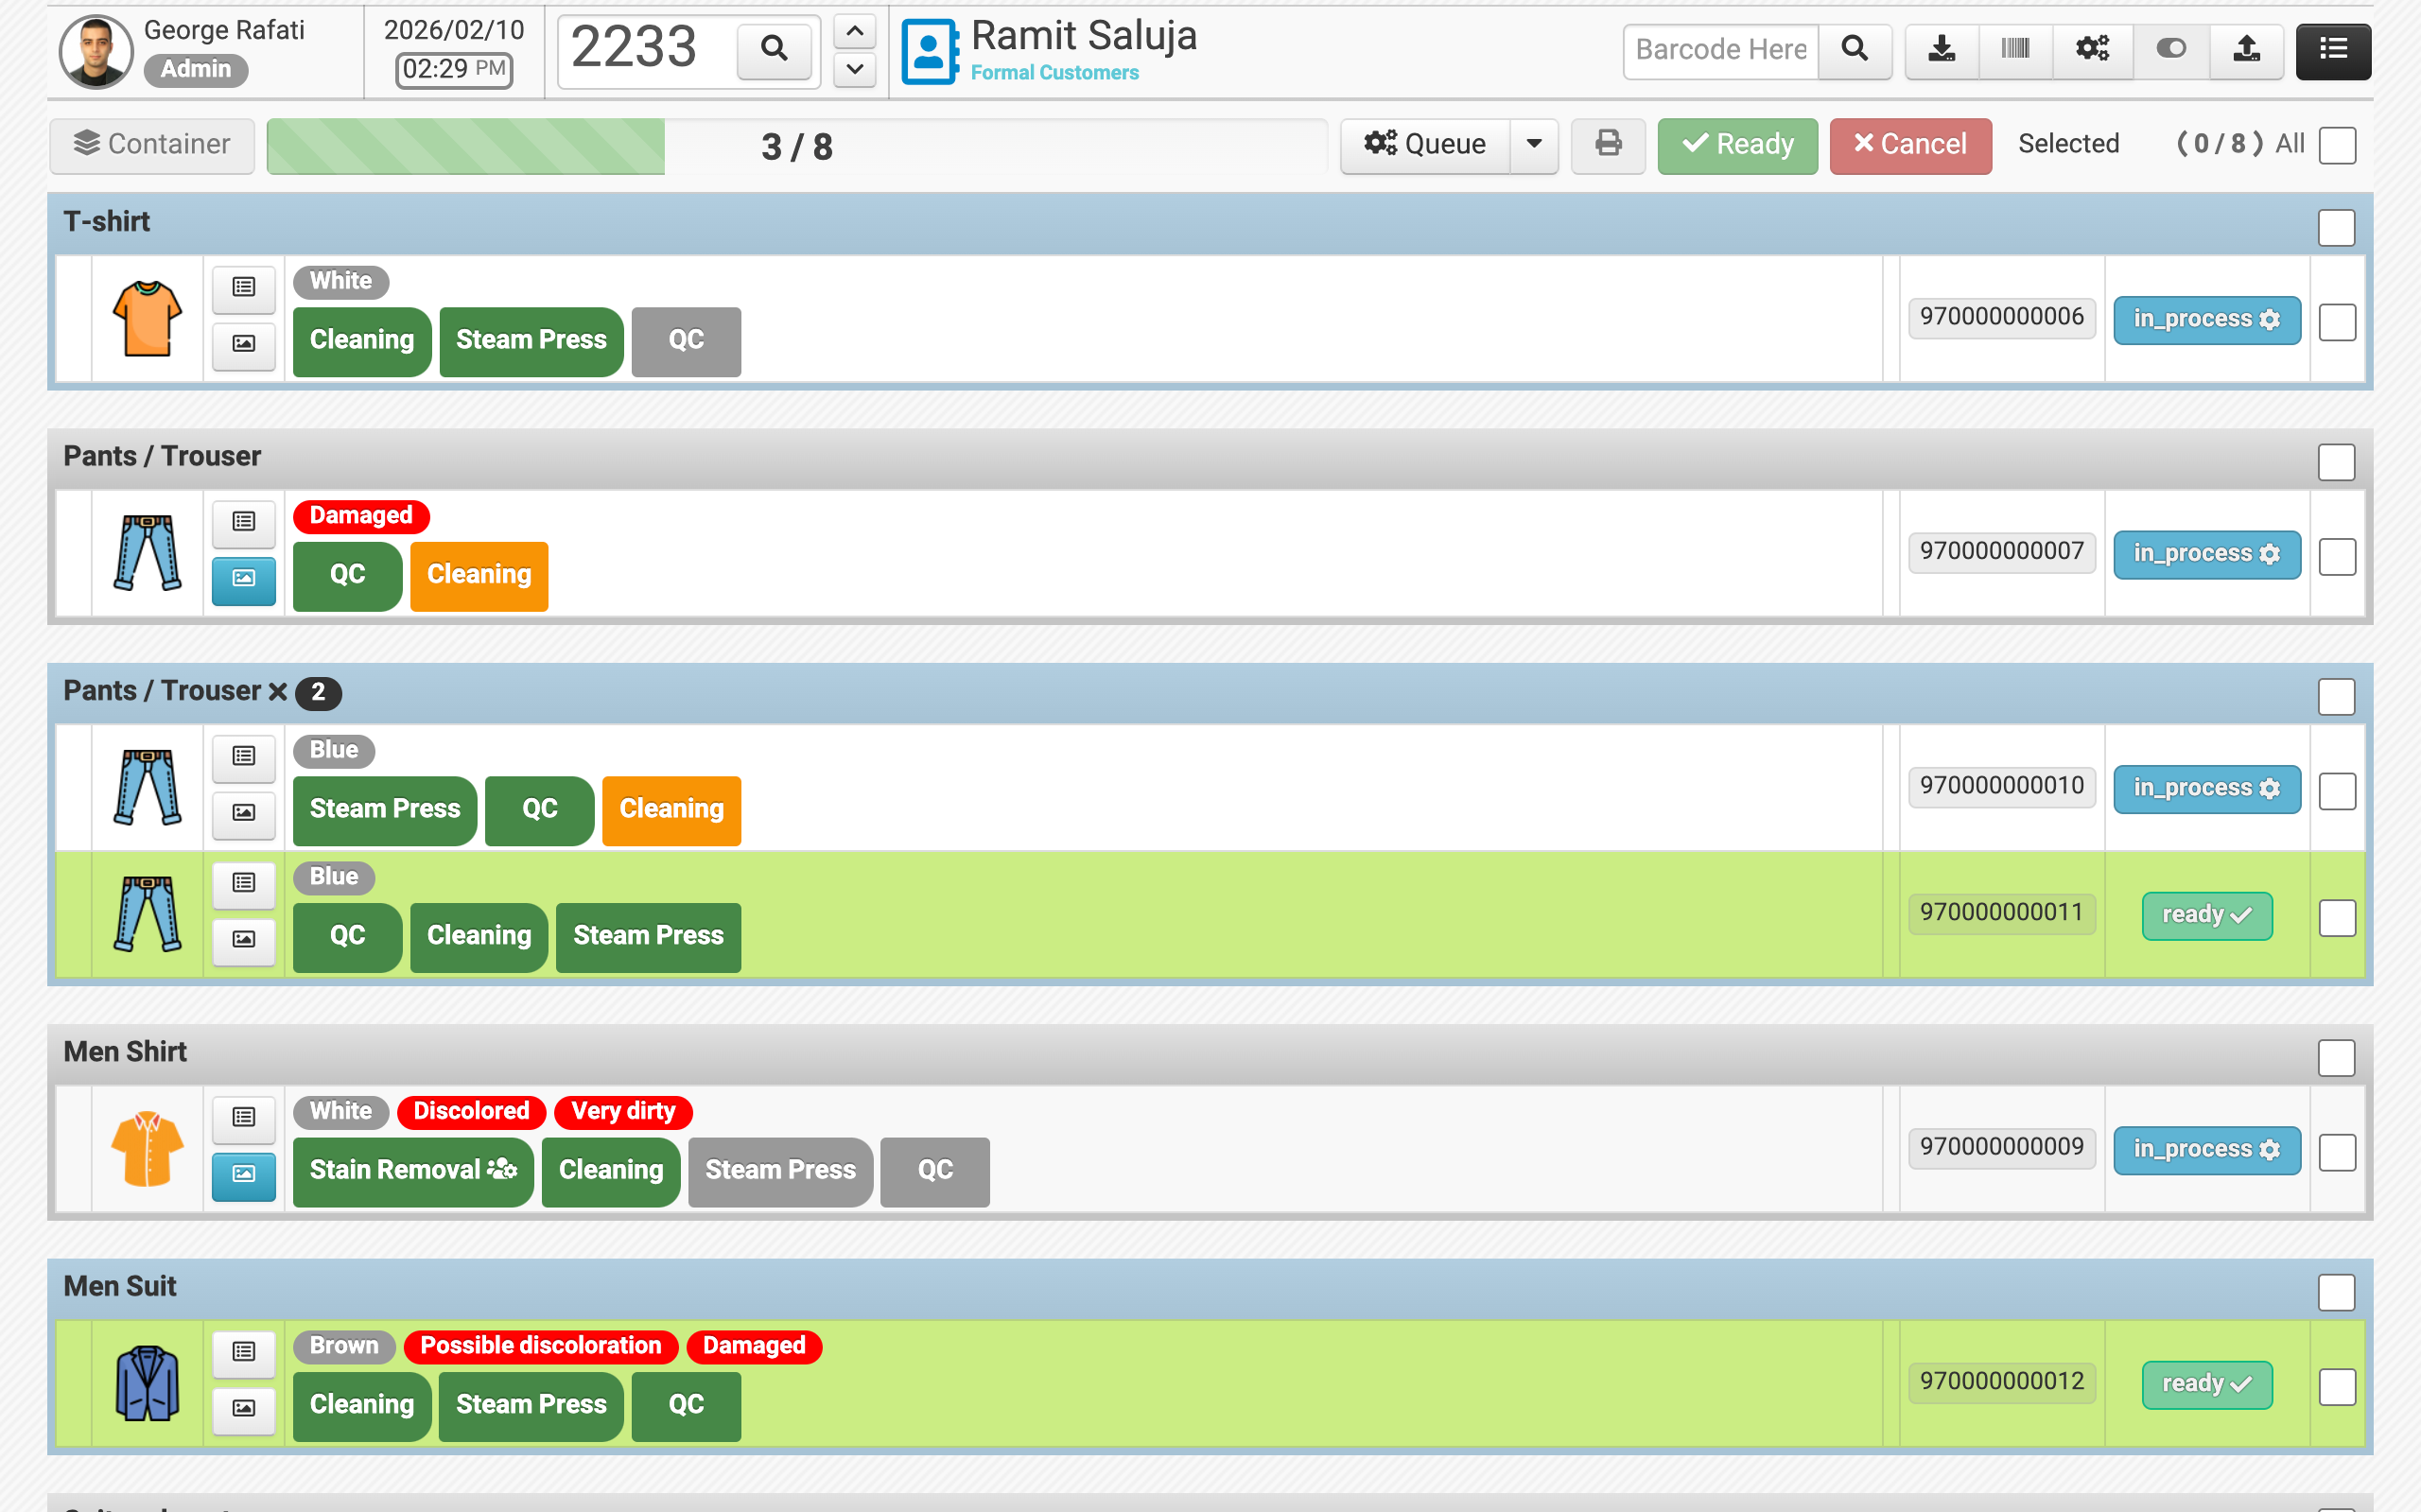
In this stage, items are selected by:
- Manual selection, or
- Scanning barcodes
Typical actions here include:
- Final quality confirmation
- Assigning final storage/container location (staging before Pick-up)
- Warnings and checks to make sure nothing is missed
On this page, the top menu may show a second row progress bar:
- Ready items vs total items
After completion, the system can optionally send an “order is ready” SMS automatically (if configured).
Related help:
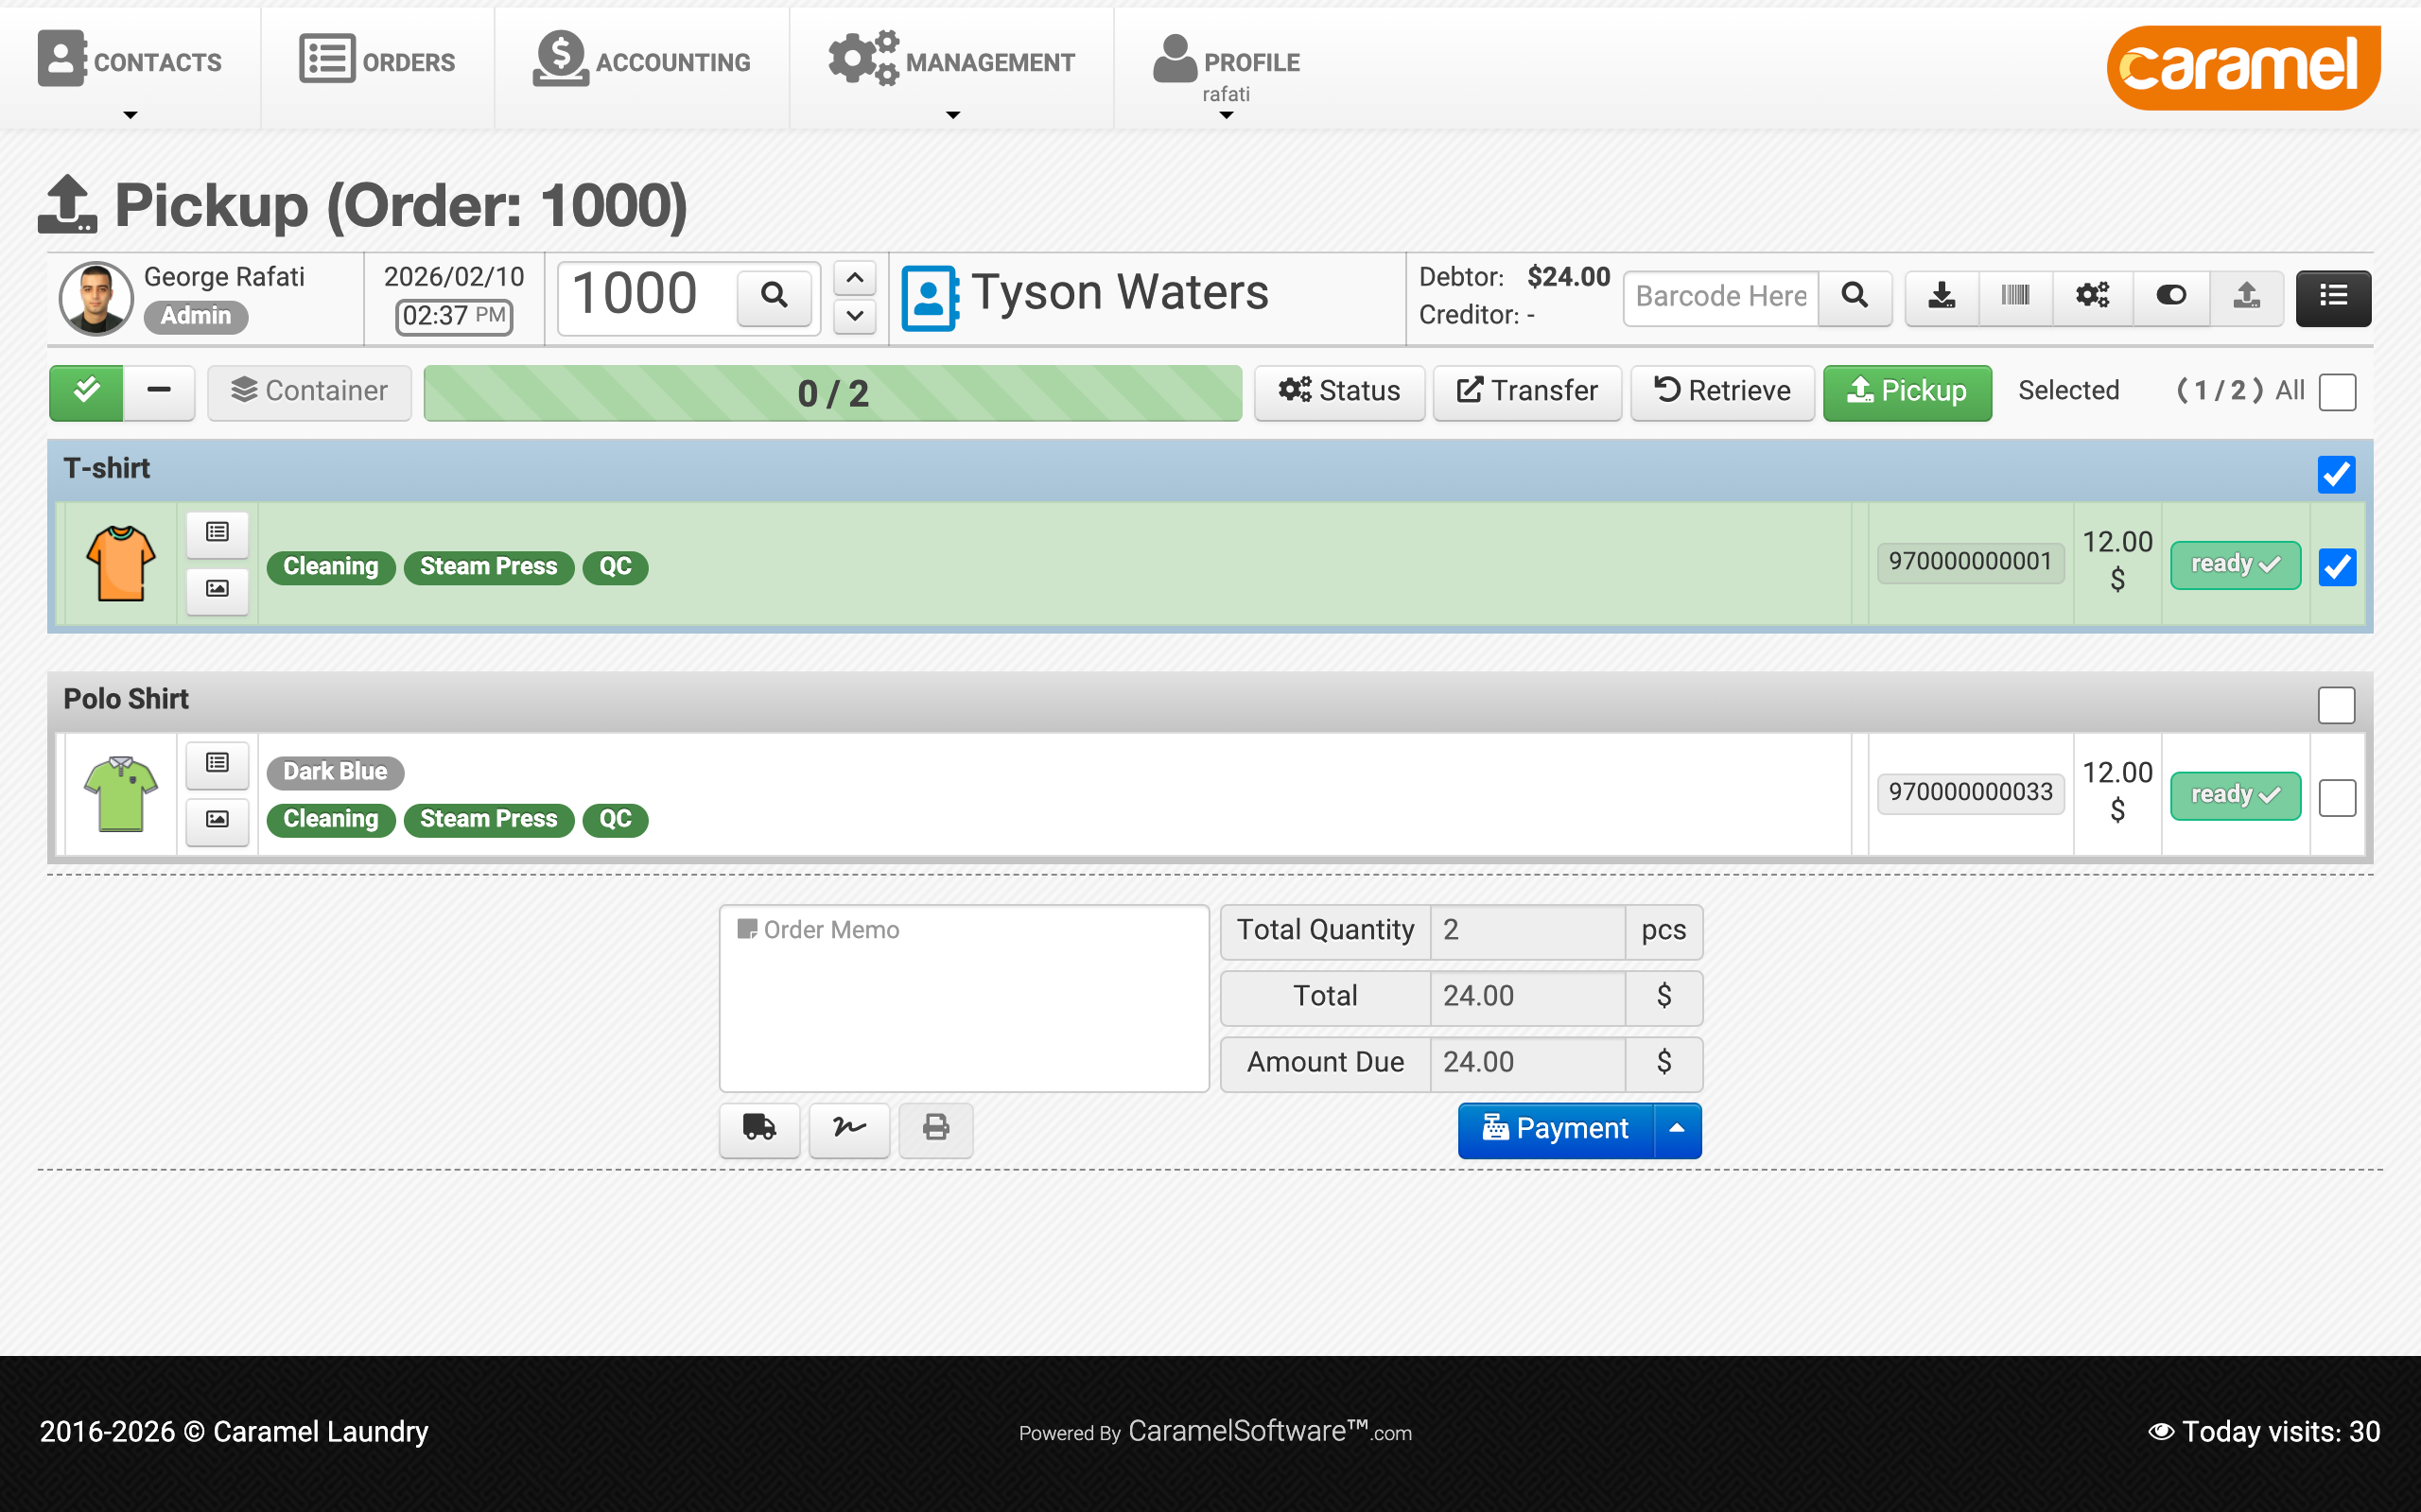
6) Pick-up (handoff)
Pick-up is the final step where items are handed to the customer.
Items are selected by:
- Manual selection, or
- Scanning barcodes
To confirm the handoff:
- Scan the final barcode command, or
- Click the delivery/hand-off button
To reduce wrong handoffs, the system can show visual and audio alerts when something doesn’t match.
If a handoff needs to be undone, the Retrieve action is available:
- Use it when an item is returned immediately or the handoff was recorded by mistake
- The reason and any incomplete operations can be tracked
This page also typically includes payment and printing actions (similar to Drop-Off, depending on configuration).
On this page, the top menu may show a second row progress bar:
- Picked-up items vs total items
Related help:
Related modules (used inside Orders)
If you need to change behavior or data used by Orders, these are the common dependencies:
- Contacts — customer data and editing
- Service Configuration — pricing and defaults
- Role Management — access control
- Calendar Management — working calendar and daily capacity
- Image Marker — item photos and gallery