Collect (QC)
The Collector (QC) page is designed for the final steps of an order: quality control, final covering/packaging, and placing Items into storage.
This screen is optimized for barcode or RFID workflows, so the operator usually doesn’t need to work directly with the computer—except for necessary actions like viewing images, selecting a storage location manually, or confirming warnings that must be acknowledged.
Use a scanner whenever possible:
- Select an Item (scan barcode/RFID or click the row)
- Run the next action using a command barcode or the top menu
- Repeat until the order is completed and placed in storage
How Collector works (in a nutshell)
You select an Item, then trigger the next step either by scanning a command barcode (recommended) or using the top menu.
Example:
- Select an Item
- Scan the Ready command barcode (or click Ready)
- Caramel performs QC logic, prints what’s needed (labels, covers, etc.), and:
- can send the “order is ready” SMS when the full order is completed
- can suggest a smart storage placement for the Item / order
If an Item has an issue and must go back to earlier steps, Caramel can support return/rework command barcodes. These command barcodes are usually implemented during setup by the support team.
Return/rework command barcodes (based on your reasons and process) are typically configured during onboarding by the support team.
Top menu (Collector row)
This page has a dedicated second row in the top menu. From left to right:
Reserve Container Order progress bar Placement Print Ready Options CancelDisabled / enabled behavior
All actions (except Placement, which navigates to another list) are disabled by default.
After you select an Item (scan RFID/barcode or click a row), the relevant actions become enabled.
The list shows Items for one order, but if you scan an Item from a different order, Caramel automatically jumps you to that order.
What each button does
Reserve
Used only if your business has Reserve logic enabled.
In most setups you won’t need to use this manually, because Caramel can automatically reserve suitable storage spaces when the first Item of an order becomes ready—trying to keep Items of the same order close together (based on capacity, size, and quantity).
Use Reserve when you want to force or adjust reservation manually.
Container
Manual assignment of a storage container/location.
This is intended for cases where you do not assign container via barcode/RFID and need to choose it manually.
Order progress bar
Shows preparation progress for the entire order as Items become ready.
When the full order is completed, a green circle with a checkmark appears at the end of the row.
If your business is multi-branch or has a workshop flow, the bar may fill in two green tones:
- Light green: completed in the workshop, not yet returned to the branch
- Dark green: returned to the branch and fully ready for pickup
Placement
Opens a list focused on Items that are ready but still missing a final/permanent storage placement.
Next to it, a small dropdown button provides alternative views:
- Queue: Items not ready yet
- Priorities: priority Items not ready yet
- Ready: ready Items not delivered yet
By default, Caramel can be configured so the main button opens Placement.
You can replace it with Queue, Priorities, or Ready based on your workflow. The most common choices are Placement or Priorities.
Print
Prints required outputs such as:
- labels for boxes/covers
- Item cover labels
- any QC-related prints defined in your setup
Ready
Runs the final QC step and sets the Item to ready (the row turns green).
Behavior depends on your rules:
- If prerequisites are missing, Caramel may show a warning and still allow Ready (or block it), based on configuration.
- Ready can also trigger printing when needed.
If you click Ready again for an Item that is already ready, Caramel prints only once to reduce waste and avoid mistakes.
To force re-print:
- click Cancel and then Ready again, or
- click Print directly
Options
Custom QC options configured in:
- Management > Options (QC section)
You can apply these options to an Item during QC. Example: “Stain did not fully remove.”
Options can be configured as:
- internal-only (hidden from customer app and prints), or
- visible to the customer (based on your policy)
Cancel
Cancels the QC “Ready” operation for the selected Item (if it was marked ready from this page), returning it to the prior QC state.
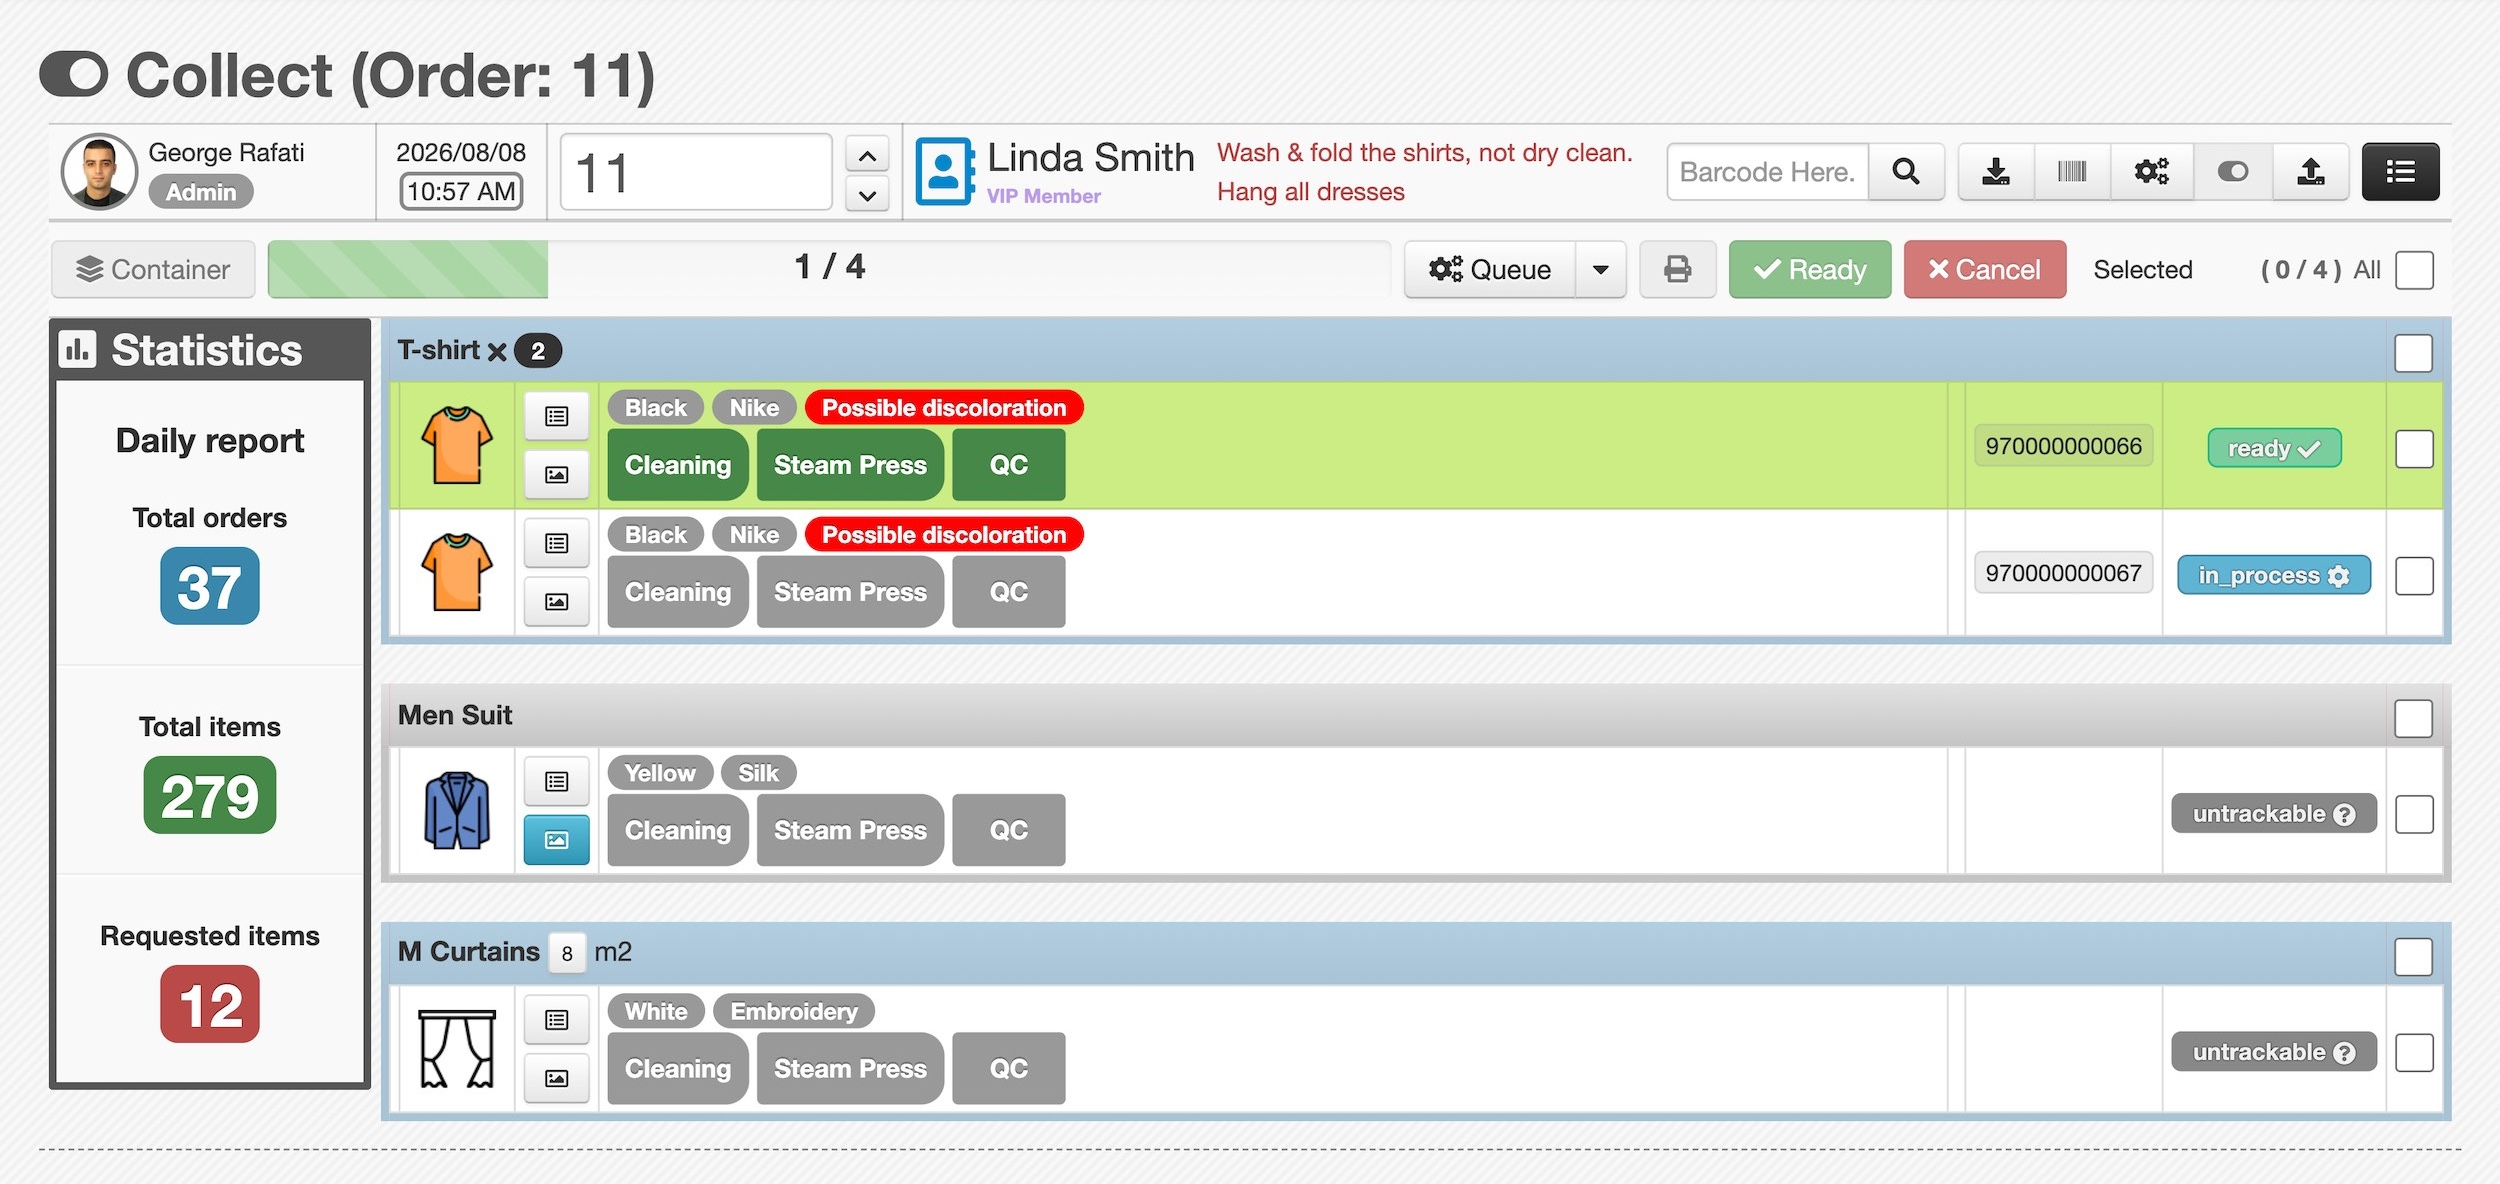
Page layout
Statistics panel (left)
A fixed panel that shows the daily performance of the currently logged-in user on Collector.
Typical metrics:
- Total orders
- Total items
- Requested items (Items the user returned back to previous steps)
The Statistics panel can be hidden by configuration during initial setup.
Items table (right)
The table lists Items of the current order in rows. Each row typically includes:
- Item icon
- buttons for slides (images) and notes
- a left-to-right series of completed operation indicators
- current storage location (example:
conveyor #183-F) - Item status (examples):
untrackablein_processsuspendedreadypicked_up
Returning Items to previous steps (rework / reject QC)
At the moment, the manual UI mainly supports:
- confirming QC and marking Ready
Returning an Item to previous steps (rejecting QC / rework) is handled via command barcodes.
You can define multiple return command barcodes for different reasons (for example: “needs rewash”, “damage found”, “missing accessory”), and these are implemented during setup.
If your team needs “reject QC” buttons inside the UI (not only command barcodes), ask the support team about enabling or customizing the Collector actions for your workflow.
Related pages
- Orders → Assignation
- Orders → Process (Workflow)
- Orders → Management (List & Search)
- Management → Options (QC options)
- Management → Calendar (capacity/working days, if applicable)